• Home
  • Suggest A DIY
  • DIY Newsletter

Jewelry Making

DIY Jewelry, Beads And Patterns

  • About CraftGossip
  • Our Network
    • Bath & Body Crafts
    • Candle Making Ideas
    • Crochet Ideas
    • Cross Stitch
    • Edible Crafts
    • Felting Patterns
    • Glass Art
    • Home & Garden Ideas
    • Indie Crafts
    • Jewelry Making
    • Kids Crafts
    • Knitting Patterns
    • Lesson Plans
    • Needlework
    • Party Ideas
    • Polymer Clay
    • Quilting Ideas
    • Recycled Crafts
    • Scrapbooking
    • Sewing Patterns
    • Card Making
    • DIY Weddings
    • Not Craft Ideas
  • Giveaways
  • Roundups
  • Store
  • Search

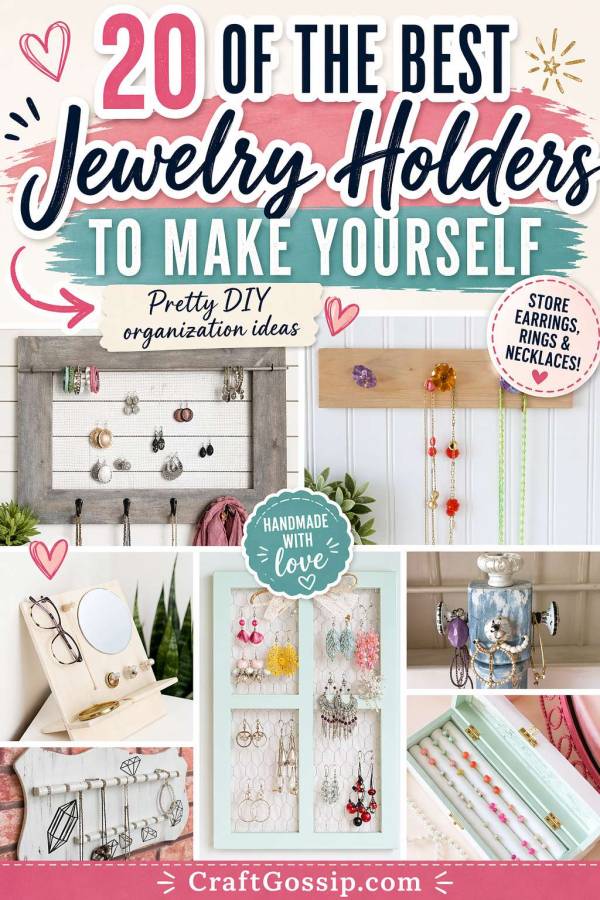
20 Jewelry Holders You Can DIY

June 22, 2021 by Shellie Wilson

If your jewelry collection is currently living in a tangled heap on the dresser, you are definitely not alone. Necklaces love to knot themselves into impossible little puzzles, earrings disappear without warning, and bracelets somehow end up everywhere except where you left them. That is exactly why DIY jewelry holders are such a smart project. They help keep your accessories organised, easy to see, and a whole lot prettier than stuffing everything into a drawer. The original roundup opens with that same very relatable problem of missing earrings and tangled necklaces, then shares 20 different storage ideas you can make yourself to suit your space and style.

One of the best things about making your own jewelry organizer is that you can customise it to fit both your collection and your decor. Whether you need a wall-mounted necklace display, a tray for rings and small pieces, a hidden organizer behind a mirror, or a farmhouse-style stand for everyday wear, this roundup has a little bit of everything. It includes projects with modern, boho, rustic, colorful, and dollar-store-friendly styles, so there are plenty of options whether your taste leans sleek and simple or more decorative and handmade.

These DIY jewelry storage ideas are perfect if you want something practical that still feels creative. Instead of buying a one-size-fits-all organizer, you can make something that works for your actual stash, whether that is mostly earrings, statement necklaces, bracelets, or a bit of everything. And let’s be honest, turning your jewelry storage into part of the room decor is a lot more satisfying than digging through a box muttering about the missing second hoop earring again.

DIY Gold Jewelry Tray from Homey Oh My

Farmhouse Charm DIY Jewelry Organizer from Live Laugh Rowe

Gemstone Jewelry Holder from A Charming Project

Copper Himmeli DIY Jewelry Holder from Refresh Living

Picture Frame Dollar Store Jewelry Organizer from Kenarry

DIY Earring Storage Box from Gluesticks Blog

DIY Hidden Wall Jewelry Organizer from Houseful Of Handmade

DIY Jewelry Tree Stand from Our Crafty Mom

DIY Rustic Industrial Jewelry Organizer from Bless’er House

Modern & Simple DIY Glass & Jewelry Organizer from The Merrythought

DIY Boho Jewelry Organizer from Ohoh Deco

Bright Patterned DIY Jewelry Organizer from Sarah Hearts

Hidden Jewelry Storage Framed Mirror from Simply Designing

Clay Relief Jewelry Holders from Centsational Style

Personalized Wooden DIY Jewelry Holder from Jaime Costiglio

Gorgeous DIY Wood Scraps Necklace Holder from Houseful Of Handmade

DIY Mirror Jewelry Wall Hangers from Homey Oh My

Beautiful Tray Jewelry Organizer from Tonya Staab

Chicken Wire Window Jewelry Holder from Crafts Unleashed

Thrifted DIY Jewelry Holder from Brooklyn Berry Designs

«
»

Have you read?

How To Fix A Broken Beaded Necklace At Home

Most crafters have at least one broken necklace sitting somewhere in a drawer, dish, jewellery box or tiny zip bag labelled “fix later.” Sometimes it is a favourite necklace. Sometimes it is a sentimental one. Sometimes it is just a pretty strand of beads that fell apart dramatically at the worst possible moment.

The good news is that many broken beaded necklaces can be fixed at home with basic jewelry making supplies.

This beginner-friendly guide will show you how to repair a broken beaded necklace, save the beads, replace the wire or cord, add a new clasp and make the necklace wearable again.

If you are new to jewelry repair, you may also want to read jewelry making tools for beginners and how to use crimp beads without ruining your necklace before you start.

Can You Fix A Broken Beaded Necklace Yourself?

In many cases, yes. If the necklace is made from ordinary beads, beading wire, cord or a simple clasp, it is usually a beginner-friendly repair.

You can often fix:

  • broken beading wire
  • loose crimp beads
  • missing clasp
  • stretched elastic
  • snapped cord
  • missing jump ring
  • uneven bead spacing
  • old necklace that needs restringing

However, if the necklace is very valuable, antique, made with fine pearls, or has delicate metalwork, you may prefer to take it to a professional jeweller.

For everyday costume jewellery, handmade pieces and sentimental bead necklaces, DIY repair is often very doable.

Supplies You May Need

Depending on the repair, you may need:

  • flexible beading wire
  • crimp beads or crimp tubes
  • clasp
  • jump rings
  • chain nose pliers
  • jewelry cutters
  • bead stopper
  • bead board or towel
  • measuring tape
  • clear jewelry glue, optional
  • elastic cord, if repairing a stretch necklace
  • small container for loose beads

You do not need every supply for every repair. Start by looking at how the necklace was originally made.

Step 1: Save Every Bead

If the necklace has broken and beads are loose, collect them carefully.

Place them in a small bowl, zip bag or bead tray. If possible, gather any broken wire, clasp pieces or jump rings too. They can help you understand how the necklace was originally put together.

If the beads scattered across the floor, check under chairs, rugs and table legs. Beads are surprisingly athletic when they escape.

Step 2: Take A Photo Before Unstringing

If part of the necklace is still intact, take a photo before removing the beads.

This helps you remember the original bead order, especially if the necklace had a pattern.

If you want to redesign the necklace, you can skip this step, but photos are helpful for sentimental pieces.

Step 3: Check The Beads

Before restringing, inspect each bead.

Look for:

  • cracked beads
  • sharp bead holes
  • missing finish
  • rough edges
  • beads that are too fragile
  • beads with old cord stuck inside

Remove damaged beads or place them aside. Sharp bead holes can cut through new wire or cord, so do not reuse beads that feel rough unless you can smooth or replace them.

Step 4: Decide What Stringing Material To Use

The right material depends on the necklace style.

Beading Wire

Use flexible beading wire for glass beads, gemstone beads, pearls and most standard beaded necklaces.

Elastic Cord

Use elastic cord only if you want a stretch necklace. This is less common for adult necklaces but may work for casual designs.

Nylon Or Waxed Cord

Use cord for large-hole beads, wooden beads, boho necklaces or no-clasp necklace designs.

Chain

If only a pendant or charm has broken off, you may simply need a new jump ring or chain.

If you are unsure, flexible beading wire is a reliable choice for many bead necklace repairs.

Step 5: Measure The Original Necklace

Lay the necklace flat and measure the length if possible.

If it was too short or too long before breaking, this is your chance to adjust it. You can use the necklace length guide for handmade jewelry makers to choose a better finished size.

For a standard everyday necklace, 18 inches is a common length. For a longer slip-over style, 28 to 32 inches may work better.

Step 6: Lay Out The Beads

Arrange the beads on a bead board or towel.

If recreating the original necklace, follow your photo. If redesigning, try a new layout.

You can:

  • remove beads for a shorter necklace
  • add spacer beads
  • add a new centre bead
  • turn extra beads into earrings
  • make a bracelet from leftover beads

For matching earrings, use this beaded earrings from leftover beads tutorial.

Step 7: Cut New Beading Wire

Cut a piece of beading wire several inches longer than your finished necklace length.

For an 18-inch necklace, cut around 24 inches of wire. This gives you enough extra length for finishing.

Secure one end with a bead stopper or tape so your beads do not slide off.

Step 8: Restring The Necklace

Thread the beads onto the new wire in your chosen order.

Check the design every so often by lifting it gently. Necklaces can look different when hanging than they do flat on the table.

Make sure the beads are not packed too tightly. A necklace needs a little movement so it can curve comfortably.

Step 9: Add The Clasp

To add a clasp with crimp beads:

  1. Thread on one crimp bead.
  2. Thread the wire through the clasp.
  3. Pass the wire back through the crimp bead.
  4. Pull gently to form a small loop.
  5. Flatten or crimp the bead securely.
  6. Thread the wire tail through several nearby beads.
  7. Trim the excess wire.

Repeat on the other end with a jump ring or extender chain.

If this step feels new, see how to use crimp beads without ruining your necklace for more detail.

Step 10: Test The Repair

Before wearing the necklace, test it carefully.

Check that:

  • the clasp is secure
  • crimps do not slip
  • beads move comfortably
  • no wire ends poke out
  • the necklace sits evenly
  • the length feels right

Give each end a gentle tug. If something slips, fix it now rather than waiting for another bead disaster.

How To Replace A Broken Clasp

If the necklace itself is fine but the clasp is broken, you may only need to replace the clasp and jump ring.

Use chain nose pliers to open the jump ring, remove the broken clasp and add a new one.

Make sure the new clasp suits the necklace weight. A tiny clasp may not be strong enough for a heavy gemstone necklace.

Lobster clasps are a good choice for many repairs because they are secure and easy to find.

How To Fix A Stretch Bead Necklace

If the necklace was made on elastic cord and has stretched out or snapped, cut away the old cord and restring the beads on new elastic.

Pre-stretch the elastic cord before stringing. Tie a secure knot, add a tiny dab of jewelry glue if desired, and hide the knot inside a large-hole bead.

For a smaller project using the same technique, try making a stretch bead bracelet for beginners.

What To Do With Missing Beads

If a few beads are missing, you have options.

You can:

  • shorten the necklace
  • add spacer beads
  • add a centre pendant
  • use beads from old jewellery
  • turn the necklace into a bracelet
  • make matching earrings with the remaining beads

A missing bead does not have to ruin the project. Sometimes the repaired version is prettier than the original.

When Not To Repair It Yourself

Consider professional repair if the necklace is:

  • valuable
  • antique
  • made with real pearls
  • made with precious stones
  • very delicate
  • made with fine metal links
  • sentimental and irreplaceable

DIY repair is wonderful, but some pieces deserve expert handling.

How To Prevent Beaded Necklaces From Breaking Again

To help your necklace last longer:

  • use proper beading wire
  • choose crimps that fit the wire
  • do not pull beads too tightly
  • avoid wearing jewelry in water
  • store necklaces flat or hanging
  • check clasps occasionally
  • keep heavy beads on strong wire

If you enjoy restoring old pieces, you may also like this bracelet made from upcycled necklaces.

A Lovely Way To Save Sentimental Jewelry

Fixing a broken beaded necklace is not just practical. Sometimes it is a way of keeping a memory wearable.

A necklace from a holiday, a gift from a friend, a strand of beads from your mum’s jewellery box — those pieces deserve more than sitting broken in a drawer.

With a few basic tools and a little patience, you can give them another life.

Tags

Bangles/Bracelets Beading Beginner Jewelry Making Book Reviews Craft Inspirations Crystal Jewelry Making DIY Necklace DIY Tutorials and Patterns earrings tutorials Felt/Fiber Halloween Jewelry For Men Jewelry Making - General Jewelry making - Supplies Jewelry Making Giveaways Jewelry Making Techniques Jewelry Making Tutorials and Ideas Mixed Media recycled/upcycled Wire Work

RSS feed: More Articles More Articles

  • Learning about Ghana for Kids
  • Garage Door Halloween Decorations
  • Thrifted Quilt Ghost Decorations for Halloween
  • 12 FREE Cute Ghost Digital Stamps to Download
  • Stitch Up Tons of Cute Patterns with The Pattern Club
  • Book Review: Japanese Temari Handbook by Emi Horie
  • A Shawlette with a Ton of Design Options
  • Woodland Whimsy Fabric Collection by Jennifer Pugh
  • Book Review: Fantasy Crochet by Jess Bertolina – 16 Whimsical Wearable Crochet Patterns
  • 12 Family Scrapbook Layout Ideas for Fall

Pick Your Blog

  • Sewing
  • Knitting
  • Quilting
  • Crochet
  • Home & Garden
  • Recycled Crafts
  • Scrapbooking
  • Card Making
  • Polymer Clay
  • Cross-Stitch
  • Edible Crafts
  • Felting
  • Glass Art
  • Indie Crafts
  • Kids Crafts
  • Jewelry Making
  • Lesson Plans
  • Needlework
  • Bath & Body
  • Party Ideas
  • Candle Making
  • DIY Weddings
  • Not Craft
  • Free Craft Projects

Copyright © 2026 · CraftGossip | Start Here | Contact Us | Link to Us | Your Editors | Privacy and affiliate policy