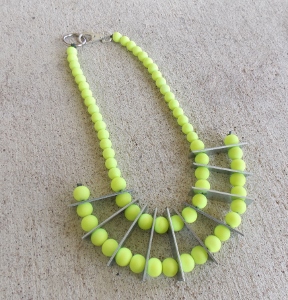
 I like this necklace. It is creative and bright in color. When I was a toddler I remember playing with my Daddy’s tools and hardware supplies in his tool box while he used his mechanical skills to work on our vehicle or whatever needed fixing around our house. It thrills me to see jewelry that can be made using hardware supplies! See how you can make your own DIY Hardware Store Inspired Necklace.
Comments
Have you read?
Hama BioBeads Review: The Eco-Friendly Fuse Beads You’ll Love

As a long-time crafter, I’ve worked with all kinds of materials, but there’s something about fuse beads that never gets old. The creativity, the colors, the nostalgia—it’s all part of the fun! But let’s be honest, traditional plastic beads aren’t exactly great for the environment. That’s why I was so excited to try Hama BioBeads, an eco-friendly alternative that promises all the fun of classic Hama beads without the plastic guilt. So, do they live up to the hype? Let’s dive in!
What Are Hama BioBeads?
Hama BioBeads are a biodegradable version of the classic Hama fuse beads. Instead of being made from petroleum-based plastic, these beads are crafted from a plant-based, eco-friendly material that naturally decomposes over time. That means less plastic waste while still enjoying the same vibrant colors and creativity that fuse bead lovers expect.
First Impressions: Do They Feel Different?
When I first opened the pack, I was curious—would they feel different from traditional beads? The answer: not really! The beads are slightly smoother to the touch, but they’re just as easy to handle, pick up with tweezers, and place on a pegboard. The colors are just as bright and bold, which was a big relief since I was worried they might look dull or faded.
One of the things I love about these beads is that they’re the same size as regular Hama beads, so they work with all my existing pegboards and accessories. No need to buy new tools or change my crafting process!
How Do They Fuse?
Now, onto the real test—how well do they iron together?
I followed my usual fusing process, using parchment paper and a medium heat setting on my iron. The beads melted together perfectly, just like regular Hama beads. No weird smells, no uneven melting—just smooth, well-bonded designs.
I also noticed that once cooled, the fused beads felt a bit sturdier than traditional plastic beads. That’s a huge plus because sometimes regular beads can feel brittle or break apart too easily.
What Makes Hama BioBeads Special?
? Eco-Friendly & Biodegradable – The biggest selling point! These beads naturally break down over time, reducing environmental impact.
? Non-Toxic & Safe for Kids – Made from natural materials, they’re a safer option for little crafters.
? Same Great Quality – They look, feel, and fuse just like classic Hama beads—no sacrifice in quality!
? Works with Existing Hama Accessories – You don’t need special pegboards or tools; they fit right into your current stash.
? Great for Schools & Eco-Conscious Crafters – If you’re an educator or a parent looking to introduce sustainability to kids in a fun way, these are perfect!
The only potential downside is that since these are a newer product, they may not be as widely available as traditional Hama beads. Some colors also seem to be in and out of stock, so if you see a set you love, I’d suggest grabbing them while you can.
If you love fuse bead crafting but want a more sustainable option, Hama BioBeads are a fantastic choice. They’re just as fun, colorful, and easy to use as regular Hama beads, but they come with the added bonus of being better for the planet. Whether you’re a hobby crafter, a parent, or a teacher, these beads are a guilt-free way to get creative.
So if you’re looking to make your crafts a little greener, give Hama BioBeads a try! Check them out here!
How is candy corn colored perler beads considered hardware store equipment? I think
the link is mixed up.
The correct link is:
http://whybuyitdiyit.wordpress.com/2013/09/05/diy-hardware-store-inspired-necklace/
pam
Oops! Sorry about that Ladies! The link is fixed. Thank you Pam for posting the correct link!
Heya! I’m at work browsing your blog from my new iphone 4!
Just wanted to say I love reading your blog and
look forward to all your posts! Carry on the
outstanding work!
Awesome, thanks so much!