• Home
  • Suggest A Craft
  • DIY Newsletter

Jewelry Making

DIY Jewelry, Beads And Patterns

  • About CraftGossip
  • Our Network
    • Bath & Body Crafts
    • Candle Making Ideas
    • Crochet Ideas
    • Cross Stitch
    • Edible Crafts
    • Felting Patterns
    • Glass Art
    • Home & Garden Ideas
    • Indie Crafts
    • Jewelry Making
    • Kids Crafts
    • Knitting Patterns
    • Lesson Plans
    • Needlework
    • Party Ideas
    • Polymer Clay
    • Quilting Ideas
    • Recycled Crafts
    • Scrapbooking
    • Sewing Patterns
    • Card Making
    • DIY Weddings
    • Not Craft Ideas
  • Giveaways
  • Roundups
  • Store
  • Search

Photo Tip for Photographing Jewelry

July 12, 2013 by Mardi Robyn

Photography Tip

Photography is a big part of jewelry making if you sell your designs, write tutorials for your blog, or want to share photographs with family and friends.

One issue I have encountered many times is lack of proper lighting when photographing jewelry indoors.  I prefer natural light. My ideal spot to take pictures of my jewelry is outdoors.  The weather isn’t always kind to a photographer as it is often unpredictable.

In South Mississippi we have had a mixture of rainy and sunny days over the past few weeks.  I love sunny days, but the heat doesn’t always agree with me.  Then there is winter. When it is cold I am not taking my jewelry pictures outdoors.  That leaves me with the necessity of coming up with good lighting indoors.   I have played around with several techniques over the years, some more satisfactory than others.  Yesterday I finally found a technique that works better than any I have tried.  I was so excited about this that I had to share it with those of you who take photographs of your jewelry to sell or share with family and friends.

My discovery, a dry erase board!   My intention was to use the dry erase board for its white background, but I soon discovered when the light hits the shiny surface it illuminates and causes the photographs to come out clear and crisp.  To begin with I held a white piece of computer paper at an angle to help with the lighting, but I found out it wasn’t needed.

Want to try it? Take a dry erase board, make sure that it is clean.  Sit it on a flat surface, I used my desk in front of my window with the curtains closed.  The only light I had on was the overhead light from my ceiling fan.  Make sure your camera is on flash. Snap your picture and viola!   So far I have had very little editing to do. Usually when I take photographs indoors I spend hours editing pictures, fixing the lighting settings, using auto adjust, etc.. to make the photograph brighter.  Using the dry erase board eliminates that.  All I have had to do is crop and resize, using the auto adjust feature on my photo software only a few times.


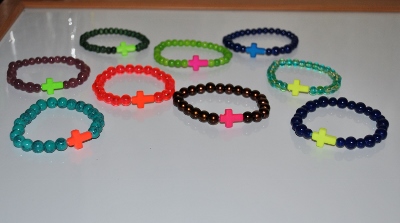
Here is a picture of bracelets without using the computer paper.

Craft Gossip

Craft Gossip

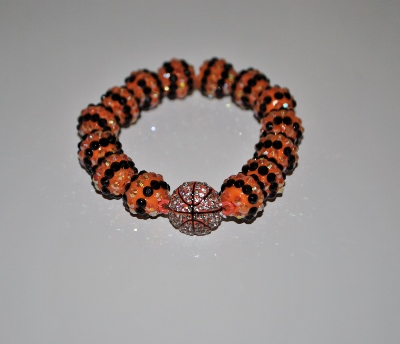
Another shot without the paper.


What do you think?  Any photo taking tips and tricks you would like to share with our readers? Feel free to email them to me or comment below!


Next Idea:

  • Soldering Tips For Jewelry Making
«
»

Comments

  1. Audrey says

    July 12, 2013 at 7:21 pm

    Sounds like a get solution to indoor lighting. I plan to give it a try. Thanks for sharing.

  2. Mosaic Magpie says

    July 13, 2013 at 5:42 am

    This is a great tip that I will trying, Thanks!
    Deb

  3. Betty says

    July 13, 2013 at 7:02 am

    This sounds like a great idea. I am going to try it for cards and scrapbook layouts. I hope it works as well with paper objects. Your jewelry looks great in the photos. Thanks for the tip

  4. Becky PS says

    July 14, 2013 at 10:50 am

    Thank you so very much! Gotta head to the Dollar store for a new white board…

  5. Mardi Robyn says

    July 15, 2013 at 3:35 pm

    Thank y’all for the comments! I hope it works well for y’all. I went to a dollar store today and they already had school supplies out, including mini dry erase board!

  6. Yuefang says

    July 17, 2013 at 5:50 pm

    Wow love to try it!!! What a simple idea for great result :).

Have you read?

Hama BioBeads Review: The Eco-Friendly Fuse Beads You’ll Love

As a long-time crafter, I’ve worked with all kinds of materials, but there’s something about fuse beads that never gets old. The creativity, the colors, the nostalgia—it’s all part of the fun! But let’s be honest, traditional plastic beads aren’t exactly great for the environment. That’s why I was so excited to try Hama BioBeads, an eco-friendly alternative that promises all the fun of classic Hama beads without the plastic guilt. So, do they live up to the hype? Let’s dive in!

What Are Hama BioBeads?

Hama BioBeads are a biodegradable version of the classic Hama fuse beads. Instead of being made from petroleum-based plastic, these beads are crafted from a plant-based, eco-friendly material that naturally decomposes over time. That means less plastic waste while still enjoying the same vibrant colors and creativity that fuse bead lovers expect.

First Impressions: Do They Feel Different?

When I first opened the pack, I was curious—would they feel different from traditional beads? The answer: not really! The beads are slightly smoother to the touch, but they’re just as easy to handle, pick up with tweezers, and place on a pegboard. The colors are just as bright and bold, which was a big relief since I was worried they might look dull or faded.

One of the things I love about these beads is that they’re the same size as regular Hama beads, so they work with all my existing pegboards and accessories. No need to buy new tools or change my crafting process!

How Do They Fuse?

Now, onto the real test—how well do they iron together?

I followed my usual fusing process, using parchment paper and a medium heat setting on my iron. The beads melted together perfectly, just like regular Hama beads. No weird smells, no uneven melting—just smooth, well-bonded designs.

I also noticed that once cooled, the fused beads felt a bit sturdier than traditional plastic beads. That’s a huge plus because sometimes regular beads can feel brittle or break apart too easily.


What Makes Hama BioBeads Special?

? Eco-Friendly & Biodegradable – The biggest selling point! These beads naturally break down over time, reducing environmental impact.
? Non-Toxic & Safe for Kids – Made from natural materials, they’re a safer option for little crafters.
? Same Great Quality – They look, feel, and fuse just like classic Hama beads—no sacrifice in quality!
? Works with Existing Hama Accessories – You don’t need special pegboards or tools; they fit right into your current stash.
? Great for Schools & Eco-Conscious Crafters – If you’re an educator or a parent looking to introduce sustainability to kids in a fun way, these are perfect!

The only potential downside is that since these are a newer product, they may not be as widely available as traditional Hama beads. Some colors also seem to be in and out of stock, so if you see a set you love, I’d suggest grabbing them while you can.

 If you love fuse bead crafting but want a more sustainable option, Hama BioBeads are a fantastic choice. They’re just as fun, colorful, and easy to use as regular Hama beads, but they come with the added bonus of being better for the planet. Whether you’re a hobby crafter, a parent, or a teacher, these beads are a guilt-free way to get creative.

So if you’re looking to make your crafts a little greener, give Hama BioBeads a try!  Check them out here!

RSS More Articles

  • Create a Reversible Skirt for Twice the Style: A Simple Sewing Tutorial You’ll Love
  • Mixed Media Photo Tins
  • Stitch Some Seagulls on Your Sweater
  • Turn Mitered Squares into a Fun Top
  • Try it with the Kids: Finger Knitting
  • Ultimate Lounge Cardigan Crochet Pattern
  • DIY Wire Spool Coffee Table: A Stylish and Sustainable Home Project
  • Unlock the Charm of English Paper Piecing: A 6-Lesson Handcrafted Online Masterclass
  • Add a Touch of Fall to Your Home with This DIY Autumn Leaf Garland
  • Quick Tip: How to Keep Cross Stitch Fabric from Fraying

Pick Your Blog

  • Sewing
  • Knitting
  • Quilting
  • Crochet
  • Home & Garden
  • Recycled Crafts
  • Scrapbooking
  • Card Making
  • Polymer Clay
  • Cross-Stitch
  • Edible Crafts
  • Felting
  • Glass Art
  • Indie Crafts
  • Kids Crafts
  • Jewelry Making
  • Lesson Plans
  • Needlework
  • Bath & Body
  • Party Ideas
  • Candle Making
  • DIY Weddings
  • Not Craft
  • Free Craft Projects

Categories

Beading Book Reviews Craft Inspirations Crystals DIY Tutorials and Patterns Felt/Fiber Halloween Jewelry For Men Jewelry Making - General Jewelry making - Supplies Jewelry Making Give Away Jewelry Making Techniques Jewelry Making Tutorials and Ideas metalwork Mixed Media necklace Polymer Clay Product Reviews recycled/upcycled Wire Work

Copyright © 2025 · CraftGossip | Start Here | Contact Us | Link to Us | Your Editors | Privacy and affiliate policy

Copyright © 2025 · Sprinkle Theme on Genesis Framework · WordPress · Log in