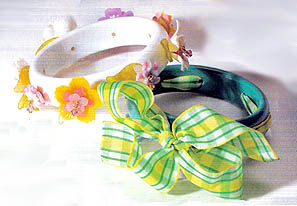
The Spring 2008 issue of Make It Mine is officially on sale today and its chock full of fun projects and inspiration like these bracelets.Â
If you haven’t seen the magazine yet, Make it Mine’s mission is ” inspire our readers to cut loose with their creativity, using basic craft skills and readily available materials. We encourage them to apply their craft skills in new ways–and to learn techniques they’ve always wanted to try. We show them quick and easy ways to turn something ordinary into something spectacular by embellishing, altering or adorning their clothes, accessories or home décor.”
With that kind of mission statement, how can you resist it?? I can’t! You can find Make It Mine Magazine in your local book store, news stand, or craft shop. Be sure to stop by their website and read their blog too for more projects!
I am honored to have 3 of my altered bangles (2 shown above) chosen for the Gallery Section of the Spring issue.  Recycling/revamping what you have has always been a part of my life and; of course, that has carried over into my jewelry work.Â
The bangles I used in the picture were plastic bracelets from the 80’s I no longer wore but kept “just in case”. They went from blah to beautiful with only a drill and a quick rummage thru my craft boxes.Â
Here is the tutorial for the ribbon bangle. It is especially versatile because you can easily change out the ribbons to match your outfit. This project is easy, quick and has a huge instant gratification factor.Â
To re-vamp your own bangle like the Plaid Ribbon Bracelet pictured, you will need the following:
- Plastic or wood bangles
- Dust Mask
- Safety glasses
- vise to hold bracelet
- A hand drill , Dremel or Flexshaft drill
- drill bit -1/4 inch for the plaid bracelet.
- ribbon or yarns of your choice
Safety is first and foremost, so don’t even think about doing this unless you have a dustmask and safety glasses. Plastic dust isn’t good for your lungs or eyes!
To decide where to drill, I marked the bracelet at 8 evenly spaced intervals with a sharpie on the outside of the bangle. It’s ok to use a marker, because you will drill away the inkmark.
TIP: Put a thin towel or piece of flannel or chamois in the vise to avoid marring the bracelet. Place bracelet in vice and secure it. Make sure it is tight and doesn’t move, but not so tight it is cracking your bangle. Put on your safety glasses and carefully and slowly drill each hole. No need for speed here-it may be challenging at first to drill if your bangle has a domed surface. Just go slow and steady and you’ll be ok.
You will probably need to rotate the bracelet every time you drill a hole, making sure its secure each time you do. Some plastics melt rather than turn to dust when you drill and it can clog up the drill bit. If this happens, turn your drill off and unplug it then carefully scrape the plastic off the bit with a utility knife.
When you are finished, wipe it down with a damp rag to get all the dust off. Thread your ribbon thru the holes and tie in a bow! You could also use shorter pieces of ribbon or fabric and tie in a number of bows around the bracelet or tie on things like bells or large buttons. Get creative, and show us what you make!


Great tutorial! Thanks so much for posting. And congrats for getting into Make it Mine – again!