Red Carousel Lion! Congratulations on your win. I have more giveaways coming this week, so hurry back.
Have you read?
10 DIY Elegant Halloween Jewellery Ideas For Adults
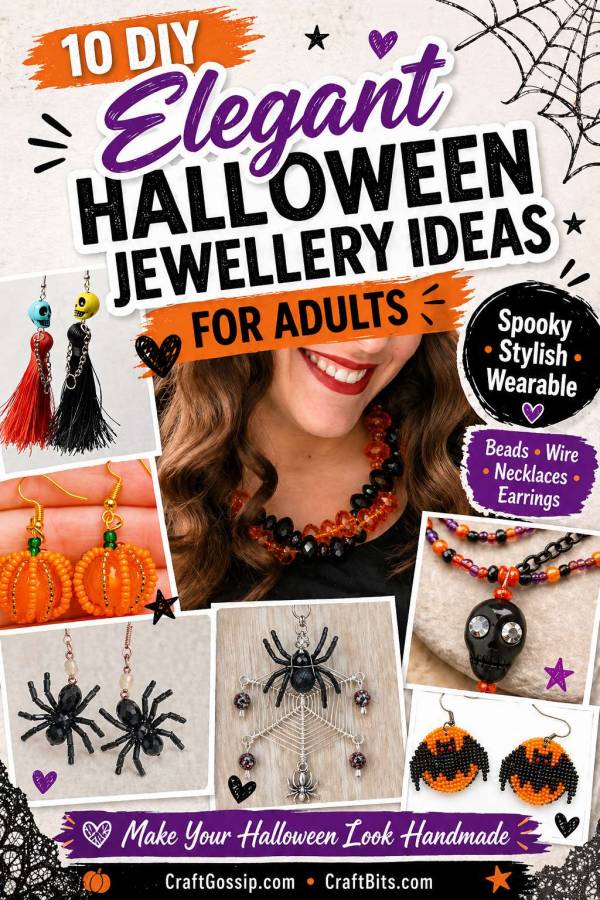
Halloween jewellery does not have to mean plastic pumpkin earrings, oversized orange beads, or novelty pieces that only come out for one night and then disappear into the back of a drawer until next October. Sometimes the prettiest Halloween accessories are the ones that whisper spooky rather than shout it across the room. A tiny skull charm on a beaded strand, a black spiderweb pendant with a bit of sparkle, a gothic choker, or pumpkin earrings made with wire and glass beads can feel festive without looking like you raided the kids’ dress-up box.
I have always loved the idea of grown-up Halloween jewellery because it gives you a way to join in the season without committing to a full costume. Handy when you have school pickups, work, dinner out, or, in my case, a dog who thinks anything dangling from my ears is clearly meant for his inspection. Elegant DIY Halloween jewellery is also a lovely excuse to use black beads, gunmetal findings, rich purples, smoky crystals, deep reds, antique brass, and all those moody little supplies we tend to collect because “they might come in handy one day.”
These Halloween jewellery tutorials are perfect for adults who want something handmade, wearable, and just a little bit dramatic. There are beaded earrings, wirework pumpkins, skull bracelets, spiderweb pendants, gothic necklaces, and a few pieces that could be styled beautifully with a black dress, velvet jacket, autumn cardigan, or even jeans and boots. Nothing too childish, nothing too throwaway — just clever handmade jewellery ideas with a spooky-season twist.
Elegant DIY Halloween Jewellery Tutorials For Adults
1. Glam Halloween Necklace Tutorial
This glam Halloween necklace is the sort of piece you can wear to a party without feeling like you’re in costume. The black, orange, and silver beading gives it a seasonal look, but the layered style keeps it polished and very wearable. It would look lovely with a plain black top or dress when you want your jewellery to do the decorating.
2. Halloween Multi-Strand Necklace With Skull Pendant
This skull pendant necklace has that perfect grown-up spooky look — a little gothic, a little beaded, and very fun for Halloween night. The multi-strand design makes it feel more like statement jewellery than a quick costume accessory. I especially like this one for using up seed beads in purple, black, gunmetal, or deep orange tones.
3. Spider Web Pendant And Earrings For Halloween
Spiderweb jewellery can go very novelty very quickly, but this project keeps it quite stylish with craft wire, glass beads, and a matching pendant-and-earring idea. It has enough detail to feel special, but it still sits nicely in that elegant Halloween jewellery space. Try it in silver and black for classic spooky, or antique copper for a more Victorian feel.
4. Creepy Halloween Bead And Wire Spider Earrings
These bead and wire spider earrings are wonderfully dramatic without being over the top. They use wirework and beads to create a proper little spider shape, which makes them ideal if you enjoy jewellery projects that feel a bit more sculptural. Make them in black crystal, smoky grey, or deep garnet beads for a more adult Halloween look.
5. Jewelry Making – Pumpkin Wire Earrings
These pumpkin wire earrings from CraftBits are a sweet Halloween and fall jewellery project that can easily be dressed up depending on your supplies. Swap the bright orange for copper wire, bronze beads, or tiny green glass accents and they suddenly become much more boutique-looking. They are quick enough for an afternoon make, which is always a win when October sneaks up on us.
6. Beaded Pumpkin Earrings
If you like seed bead projects, these beaded pumpkin earrings are a lovely seasonal make. The shape is cute, but the beaded texture gives them a more finished jewellery look than a simple charm earring. For an elegant version, I’d try muted pumpkin tones, copper seed beads, or even black and bronze for a Halloween evening outfit.
7. DIY Dripping Blood Earrings
These dripping blood earrings are definitely for the Halloween lovers who like a bit of drama. Because they are made with hot glue and nail polish, they are budget-friendly, but you can make them look more polished by using deep wine red, gloss varnish, or a subtle red glitter finish. They would be fabulous with a vampire-inspired outfit or a simple black dress.
8. Halloween Skull Bead And Tassel Drop Earrings
Skull beads and tassels are a brilliant combination for adult Halloween jewellery because they add movement without feeling too cutesy. This CraftGossip feature is a great starting point if you love earrings that feel festive but still wearable. Use black silk tassels, metallic skull beads, or deep jewel tones to make them feel more elegant.
9. Colorful Skull Bracelets
These skull bracelets are beginner-friendly, but they can easily be styled in a more grown-up way. Instead of bright rainbow colours, try black skull beads with hematite, smoky quartz, deep purple glass beads, or antique gold spacers. It is a simple strung bracelet project, which makes it perfect for jewellery makers who want something quick but still seasonal.
10. Beaded Bat Earrings Tutorial
For seed bead lovers, these beaded bat earrings are such a fun Halloween challenge. The bat motif is festive, but beadwork gives the design a more intricate handmade feel. They would be gorgeous in matte black beads with a tiny metallic accent, especially if you prefer Halloween jewellery that feels detailed rather than loud.
Styling Elegant Halloween Jewellery Without Looking Too Costumey
The trick with elegant Halloween jewellery is choosing one statement piece and letting it have its moment. A spiderweb pendant with a plain black blouse, skull earrings with a soft cardigan, or a beaded pumpkin bracelet with a rust-coloured sweater can feel seasonal without tipping into full costume territory. I love pieces like these because they let you enjoy Halloween in a way that still feels stylish and personal.
If you are making jewellery to gift, these projects also work beautifully for friends who enjoy Halloween but do not necessarily dress up. Pop a pair of earrings onto a handmade earring card, add a little black ribbon, and you have a thoughtful October gift that feels much nicer than another bag of sweets. Not that I am against sweets, mind you — I simply believe handmade earrings and chocolate can happily live in the same gift bag.