Copper jewelry has such a lovely handmade warmth to it, doesn’t it? It can look rustic, earthy, modern, vintage, industrial — sometimes all at once depending on how you finish it. But if you really want to give your copper pendants, charms, beads, or bracelet blanks some texture and personality, copper etching is one of those techniques that makes people say, “Wait, you made that?”
This electrolytic copper etching tutorial is a clever way to add patterns, lines, symbols, textures, and decorative details to copper without using traditional acid etching chemicals. Instead of ferric chloride, this method uses a simple electrical current, saltwater, copper, and a resist design to slowly remove the exposed copper surface.
It sounds a bit science-lab-at-the-kitchen-table, I know. But that is half the fun.
The original tutorial from Copperheart Designs shares a wonderfully approachable version of this method, using a D battery, a battery holder, alligator clips, saltwater, copper wire, the copper piece you want to etch, and a scrap piece of copper. It is one of those jewelry making techniques that feels a little intimidating at first glance, but once you understand what is happening, it becomes much less mysterious.
And yes, this is exactly the sort of project where you suddenly start looking at every copper blank in your stash and thinking, “You’re next.”
What Is Electrolytic Copper Etching?
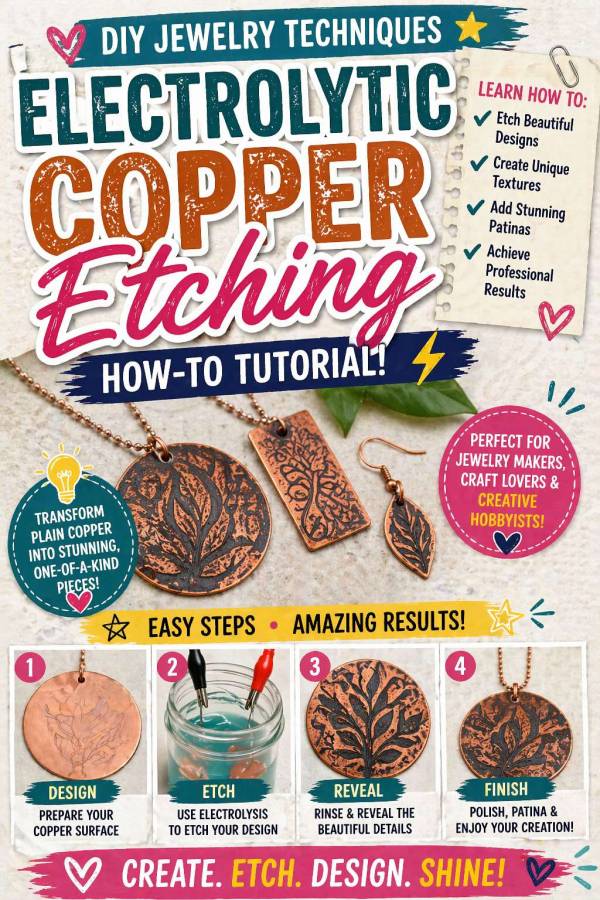
Electrolytic copper etching is a method of removing copper from the surface of a metal piece using an electrical current. The areas covered with resist stay protected, while the uncovered areas are etched away.
In very simple crafter terms:
You draw or transfer a design onto clean copper using a resist.
The copper piece is placed into a saltwater bath.
A scrap piece of copper is added as the second electrode.
A battery creates a small electrical current.
The exposed copper slowly etches away, leaving your design behind.
This makes it a useful jewelry making technique for creating:
- etched copper pendants
- handmade copper charms
- copper earring components
- etched cuff bracelet blanks
- patterned copper beads
- rustic mixed-media jewelry pieces
- handmade metal tags
- decorative copper focal pieces
If you love metal jewelry but don’t want to dive straight into torch work, soldering, or chemical etching, this is a really interesting technique to explore.
Why Try Electrolytic Etching Instead Of Traditional Copper Etching?
Traditional copper etching often uses chemical etchants such as ferric chloride. Many jewelry makers use it successfully, but it can feel messy, intimidating, and awkward to dispose of safely.
Electrolytic etching still needs care and common sense, but it appeals to crafters because it uses a more approachable saltwater-and-battery setup. Copperheart Designs originally shared the method while looking for a healthier studio practice, and that is a big part of why this technique has remained popular with curious jewelry makers.
A few reasons jewelry makers like this method:
- It uses easy-to-find supplies.
- It does not require a large studio setup.
- It is suitable for small copper jewelry pieces.
- It allows you to create custom designs.
- It gives copper a handmade, artisan finish.
- It is a great beginner metalwork experiment.
That said, this is still a metalworking project. It is not something I would do with children, around pets, or on the same table where dinner is about to be served. Set up properly, label your supplies, and treat your workspace like a tiny jewelry studio rather than a casual glitter-glue session.
Basic Supplies For Electrolytic Copper Etching
For this project, you will need:
- Copper blanks, copper sheet, copper beads, or copper jewelry components
- Scrap copper piece
- D battery
- D battery holder
- Alligator clips
- Heavy copper wire
- Pure salt, such as kosher salt or pickling salt
- Plastic or glass container
- Water
- Resist for your design
- Scrub pad, fine abrasive pad, or brass brush
- Gloves
- Eye protection
- Paper towels or rags
- Container for saving used solution for proper disposal
Helpful extras:
- Fine permanent paint pen or resist pen
- Stop-out varnish or asphaltum
- Press-n-Peel film for transferred designs
- Small plastic tweezers
- Polishing pads
- Liver of sulfur or patina solution
- Jewelry sealant or wax
- Rotary tool for finishing edges
- Hole punch for copper blanks
Affiliate-friendly note: If you are new to metal jewelry making, a small starter kit with copper blanks, alligator clips, a battery holder, polishing pads, and a resist pen can save a lot of rummaging. Though let’s be honest, rummaging through supplies is half the sport.
Choosing The Right Copper For Etching
Start with plain copper. Copper sheet, copper blanks, or solid copper beads are best for this kind of jewelry project.
For beginners, flat copper blanks are easiest because you can clean them well, apply a design neatly, and see the etched result clearly. Round beads and curved surfaces are beautiful, but they are a little trickier because the resist can be harder to apply evenly.
Good beginner copper projects include:
- simple round pendant blanks
- rectangle copper tags
- oval earring blanks
- cuff bracelet strips
- small copper charms
- flat copper washers
Avoid plated metals for this technique unless you know exactly what the metal is made from. Plated pieces can behave unpredictably, and once you etch through the surface layer, you may end up with a mess rather than a beautiful handmade jewelry component.
Preparing Your Copper Before Etching
This is one of those steps where being a little fussy pays off.
The copper needs to be very clean before you add your design. Any oil, dirt, fingerprints, or residue can act like an accidental resist and stop areas from etching evenly.
Clean your copper with a scrub pad or fine abrasive pad until the surface looks fresh and even. Rinse it well, then avoid touching the front surface with your fingers. Skin oils are sneaky little troublemakers in metalwork.
If you have ever painted furniture and skipped the sanding step, you already know this lesson. Prep work is boring until it saves the whole project.
Adding A Resist Design
The resist is what protects parts of the copper from being etched. Wherever the resist stays in place, the copper underneath should remain raised. Wherever the copper is exposed, the etching happens.
Possible resist options include:
- stop-out varnish
- asphaltum
- Press-n-Peel film
- specialist resist pens
- paint pens, depending on the brand and depth of etch needed
Permanent marker may not hold up well enough for a deep etch, especially in a saltwater bath. It can be fine for a very quick experiment, but for jewelry you actually want to wear or sell, use a more reliable resist.
Design ideas for etched copper jewelry:
- leaves and vines
- simple florals
- moons and stars
- geometric lines
- folk art patterns
- initials or monograms
- abstract texture marks
- mandala-style details
- stamped-looking borders
- tiny hearts, dots, and dashes
Keep your first design simple. Thin delicate lines can be beautiful, but they are easier to lose if the resist breaks down or the etch goes too far. A bold beginner design gives you a better chance of success.
Setting Up The Saltwater Bath
The saltwater solution acts as the electrolyte. In the Copperheart Designs tutorial, the setup uses a saturated salt solution, meaning as much salt as can dissolve into the water.
Use a plastic or glass container rather than metal. The container should be deep enough that your copper pieces can hang in the solution without touching each other or lying flat on the bottom.
The basic setup is:
- The copper piece you want to etch is connected to the positive lead.
- The scrap copper is connected to the negative lead.
- Both pieces are suspended in the saltwater solution.
- The two copper pieces should not touch.
- The battery provides the current that starts the etching process.
Once connected correctly, you should see small bubbles around the scrap copper. Over time, the water may become cloudy or reddish-brown as copper moves into the solution.
How Long Does Copper Etching Take?
For a visible etch, you may begin to see results after around 30 minutes. For a deeper etch, it can take an hour or more, depending on your setup, copper thickness, resist, battery strength, and the look you want.
Beginner tip: check your piece regularly rather than wandering away and deciding to “just quickly” reorganize your bead drawer. That drawer will eat two hours of your life, and your copper may not thank you.
A shallow etch can look delicate and subtle. A deeper etch gives more dramatic texture and is often better for pendants, cuff blanks, and focal pieces that will be oxidized or patinated later.
Safety Tips For Electrolytic Copper Etching
Even though this technique avoids traditional chemical etching solutions, it still needs to be handled sensibly.
Use these safety tips:
- Work in a well-ventilated area.
- Wear gloves and eye protection.
- Keep food and drinks away from the workspace.
- Do not use your good kitchen containers.
- Label all containers and tools used for etching.
- Keep children and pets away from the setup.
- Do not leave the etching bath unattended.
- Do not let the copper pieces touch while connected.
- Disconnect the battery before adjusting pieces.
- Do not pour used copper solution down the drain.
That last point matters. The used solution can contain copper residue, and copper does not belong in household drains or waterways. Save the used solution in a clearly labelled container and contact your local waste management service for disposal advice. Copperheart Designs specifically warns not to pour the coppery water down the drain.
Finishing Your Etched Copper Jewelry
Once your piece has etched to the depth you like, disconnect the battery first. Then remove the copper from the bath and rinse it well.
You will then need to remove the resist. The method depends on what resist you used, so follow the instructions for that product.
After cleaning, you can finish the copper in several ways:
- polish it for a bright copper look
- darken it with liver of sulfur
- use a heat patina for colour variation
- tumble it for a smoother finish
- sand the raised areas for contrast
- seal it with wax or jewellery sealant
- add jump rings, ear wires, chain, or cord
One of my favourite looks for etched copper is a dark patina worked into the etched lines, then the raised surface lightly polished back. It makes the design pop beautifully and gives that lovely handmade market-stall look — in the best possible way.
Troubleshooting Electrolytic Copper Etching
My copper is not etching
Check that your battery is working, your clips are connected properly, and the positive lead is attached to the copper piece you want to etch. Also make sure both copper pieces are submerged in the saltwater solution but not touching.
My resist is lifting
Your copper may not have been clean enough, or the resist may not be strong enough for a longer etch. Try cleaning the copper more thoroughly and using a stronger resist such as stop-out varnish or a specialist resist product.
My design looks patchy
Patchy etching can happen when the metal has oil, dirt, air bubbles, or uneven resist. Clean the copper well before starting and gently check the piece during etching.
My etch is too shallow
Leave it in the bath longer, but keep checking it. A weak battery or poor connection can also slow the etching process.
My design lines disappeared
The resist may have broken down, or the design may have been too fine for the etching time. Try a bolder design for your next piece.
Creative Ideas For Etched Copper Jewelry
Once you have tried a basic pendant or charm, there are so many ways to use etched copper in handmade jewelry.
Try making:
- rustic copper earrings with leaf designs
- etched copper charm bracelets
- handmade copper gift tags
- copper focal pendants with stamped words
- mixed-media necklaces with beads and fibre
- etched copper cuffs with botanical patterns
- boho copper earrings with turquoise beads
- copper-and-leather bracelets
- celestial moon-and-star charms
- handmade Christmas ornament tags
This is also a great technique if you sell handmade jewelry, because etched copper pieces look custom, artisan, and far more complicated than they actually are once you get the hang of the process.
More Jewelry Making Ideas To Explore
If you enjoy this copper etching technique, you might also like exploring other handmade jewelry methods such as soldering tips for jewelry making, wirework cuff tutorials, DIY bracelet tutorials, and beginner jewelry making projects here on CraftGossip.
Copper etching pairs beautifully with wire wrapping, beadwork, leather cord, stamped metal blanks, and rustic mixed-media jewelry. It is one of those techniques that lets you turn a plain piece of copper into something that looks like it came from a little artisan studio tucked away behind a garden gate.
Which, frankly, is the dream.
Read The Full Tutorial
You can see the original step-by-step tutorial here:
FAQ: Electrolytic Copper Etching For Jewelry Making
What is electrolytic copper etching?
Electrolytic copper etching is a jewelry making technique that uses an electrical current and a saltwater solution to remove exposed copper from a metal surface. Areas protected with resist remain raised, while uncovered areas are etched away to create a design.
Is electrolytic copper etching good for beginners?
Yes, it can be a good beginner metalwork project if you follow safety precautions carefully. Start with a small flat copper blank and a simple design before trying curved beads or detailed patterns.
Do I need acid to etch copper this way?
No. This method uses saltwater and an electrical current rather than traditional acid etching chemicals. However, the used solution can still contain copper residue and must be disposed of responsibly.
Can I use table salt for copper etching?
Pure salt such as kosher salt or pickling salt is usually recommended because it does not contain extra additives. The Copperheart Designs tutorial uses pure salt in a saturated saltwater solution.
Can I use a Sharpie as a resist?
A regular permanent marker may not hold up well enough for a deep etch. Some paint pens or specialist resist pens may work better, but for more reliable results, use a stronger resist such as stop-out varnish, asphaltum, or a proper transfer resist.
How long does electrolytic copper etching take?
A light visible etch may appear in around 30 minutes, while a deeper etch can take an hour or more. Timing depends on the battery strength, copper size, resist quality, and how deep you want the design to be.
Can I etch copper beads with this method?
Yes, copper beads can be etched, but they are trickier than flat blanks. You need to apply the resist carefully around the bead and suspend it in the solution so it etches evenly.
Can I reuse the saltwater solution?
Some makers reuse the solution for multiple etching sessions, but it should be stored safely, labelled clearly, and kept away from children and pets. Do not pour copper-contaminated solution down the drain.
How do I dispose of used copper etching solution?
Store the used solution in a labelled container and contact your local waste management service for disposal advice. Copper residue should not be poured into household drains or waterways.
What can I make with etched copper?
Etched copper is perfect for handmade pendants, earrings, bracelets, charms, cuff blanks, beads, tags, and mixed-media jewelry. It works especially well with rustic, boho, botanical, celestial, and vintage-inspired designs.