• Home
  • Suggest A DIY
  • DIY Newsletter

Jewelry Making

DIY Jewelry, Beads And Patterns

  • About CraftGossip
  • Our Network
    • Bath & Body Crafts
    • Candle Making Ideas
    • Crochet Ideas
    • Cross Stitch
    • Edible Crafts
    • Felting Patterns
    • Glass Art
    • Home & Garden Ideas
    • Indie Crafts
    • Jewelry Making
    • Kids Crafts
    • Knitting Patterns
    • Lesson Plans
    • Needlework
    • Party Ideas
    • Polymer Clay
    • Quilting Ideas
    • Recycled Crafts
    • Scrapbooking
    • Sewing Patterns
    • Card Making
    • DIY Weddings
    • Not Craft Ideas
  • Giveaways
  • Roundups
  • Store
  • Search

Featuring: Hande Made It

October 22, 2013 by Mardi Robyn

Hande Made ItHand Made It

It is my pleasure to feature jewelry making designer Hande, and her shop Hande Made It.    I asked if Hande would be willing to let me do the feature and tell some about her and her shop, she kindly obliged.  Read what she had!

Hande  Made It – Color your life!

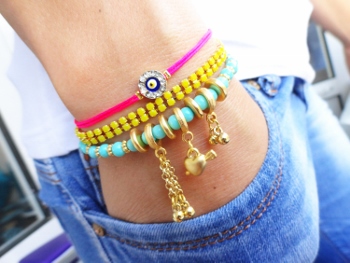
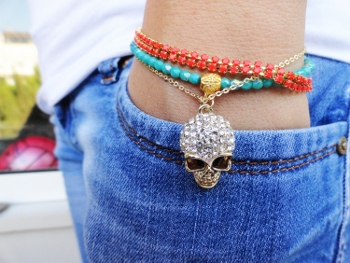
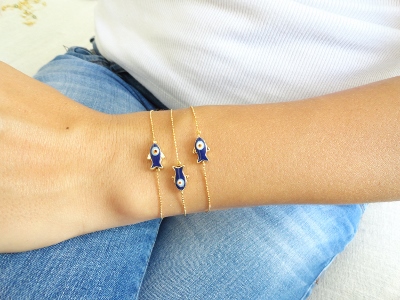
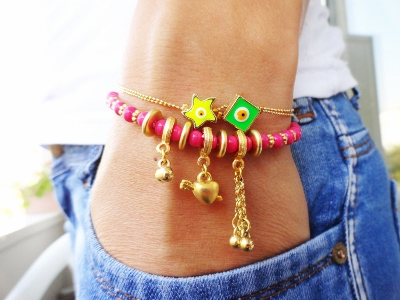
Hello, This is Hande, from Istanbul, Turkey! My day time job is marketing but while I was living in Colorado for studying, I met with Etsy and I decided to make my chilhood dream comes true 🙂 I started with cross stitch products such as bookmarks, funny quotes with frame… After I moved back to Turkey again, My sister Asl? and I changed my shop to a jewel box! Cause We felt like We were enjoying more while we were playing with the beads! We are usually using an evil eye cause it is part of our culture and we can easily find various of evil eye beads and charms in Istanbul. Also neon colors and kind of ethnic style bracelets are our favorites too. We love to create colorful products cause it makes us feel that it is summer all the time 🙂

We have been trying to list new products all the time to keep our shop fresh! We are also working with some boutiques around the world such us South Africa, Australia, Germany, France, United States and more! That is also make us so happy to reach more people.
 

Hande Made ItHande Made It

Look at her beautiful, trendy jewelry pieces!   Her shop “Hande Made It” on Etsy is full of beautiful jewelry in all shapes and styles.  You are sure to find something you like!  Her Jewelry is for everyone.

Visit her shop and you will find a coupon code on her shops banner that will save you 20% on your order.  Yay!
Hande Made It

     While you are checking out all her beautiful designs, be sure to follow her on Facebook and Instagram!

Hande Made It

Shop:  http://www.etsy.com/HandeMadeIt

Facebook: http://www.facebook.com/HandeMadeIt

Instagram: @HandMadeIt_Jewelry


~*~Special thanks to Hande for allowing me to feature her lovely shop, and for submitting the write-up and photographs. Photographs are property of Hande Made It.~*~
«
»

Comments

  1. Stuart says

    October 25, 2013 at 11:27 am

    These are nice and bright and in your face, So should look lovely in the summer.

Trackbacks

  1. Featuring: Hande Made It | DIY Craft Projects says:
    October 22, 2013 at 6:35 pm

    […] Source: http://jewelrymaking.craftgossip.com/featuring-hande-made-it/2013/10/22/ […]

Have you read?

How To Make A Stretch Bead Bracelet For Beginners

Stretch bead bracelets are one of the easiest jewelry making projects for beginners, and they are wonderfully satisfying because you can finish one in a single sitting. No clasp, no crimp beads, no complicated wirework — just beads, stretchy cord and a good secure knot.

This is the sort of handmade jewelry project that is perfect for using up leftover beads, making quick gifts, or dipping your toes into beginner jewelry making without buying half the craft store. Although, let’s be honest, beads do have a way of following us home.

A stretch bracelet is also a lovely project for craft nights, teenagers, handmade market prep, party favours, stocking stuffers and “I need a quick gift but I refuse to buy something boring” moments.

If you have already tried making a simple beaded bracelet for beginners, this stretch bead bracelet is a nice no-clasp version to add to your jewelry-making list.

Why Stretch Bracelets Are Great For Beginners

Stretch bracelets are beginner-friendly because they use very few supplies. You do not need a clasp or special finishing findings, and the bracelet is easy to put on and take off.

They are also very forgiving. If your first design looks a little too busy, you can unstring the beads and try again. That is one of the joys of beginner bead projects — nothing is permanent until you tie the knot.

Stretch bracelets are great for:

  • beginner jewelry makers
  • kids and teens with supervision
  • handmade gifts
  • craft group projects
  • bead stash projects
  • gemstone bracelets
  • friendship bracelets
  • matching mother-daughter bracelets

Supplies You Will Need

To make one stretch bead bracelet, you will need:

  • Beads of your choice
  • Stretch jewelry cord
  • Scissors or jewelry cutters
  • Bead stopper, clip or tape
  • Clear jewelry glue, optional
  • Measuring tape
  • Small bead tray or towel

Good bead choices include glass beads, gemstone beads, acrylic beads, seed beads, clay heishi beads, wooden beads and pearls. For your first bracelet, medium-sized beads are easiest to manage.

If you are building a beginner jewelry kit, a bead board, bead storage box and a roll of quality elastic cord are worth having. You will use them again and again.

Choosing The Best Elastic Cord

Not all elastic cord is equal. Some cords are too flimsy, some stretch out quickly, and some are too thick for small bead holes.

For beginner stretch bracelets, choose elastic cord that:

  • fits through your beads easily
  • feels strong when gently pulled
  • knots securely
  • is not too thin for heavier beads
  • has enough stretch to slip over the hand

If you are using heavier glass or gemstone beads, choose a stronger elastic cord. If you are using tiny seed beads, make sure the cord is thin enough to pass through the bead holes.

The trick is finding a cord that is strong but still fits your beads. It is a little like choosing jeans — the right fit makes everything easier.

How To Measure For A Stretch Bracelet

Wrap a soft measuring tape around your wrist where you want the bracelet to sit. Add around 1/2 inch for a comfortable fit.

For larger beads, add a little more room because chunky beads sit further away from the wrist.

As a simple guide:

Wrist SizeFinished Bracelet Length
6 inches6.5 inches
6.5 inches7 inches
7 inches7.5 inches
7.5 inches8 inches
8 inches8.5 inches

If you are making a bracelet as a gift and do not know the wrist size, 7 to 7.5 inches is a common adult bracelet size.

Step 1: Plan Your Bead Design

Lay your beads out on a bead board, towel or piece of felt. A soft surface stops beads from rolling away, which is very helpful unless your hobby includes crawling under furniture.

You can make a simple repeating pattern or a random mix.

Try these easy stretch bracelet ideas:

  • pearl, spacer, pearl, spacer
  • gemstone bead, metal spacer, gemstone bead
  • rainbow beads in colour order
  • neutral beads with one charm bead
  • clay heishi beads in soft pastel colours
  • wooden beads with one feature bead

If you want your bracelet to look balanced, place your feature bead in the centre and mirror the pattern on both sides.

Step 2: Cut The Elastic Cord

Cut a piece of elastic cord several inches longer than your finished bracelet size. For most adult bracelets, 10 to 12 inches gives you enough cord to work with.

Do not cut the cord too short. You need enough extra length to tie a good knot comfortably.

Step 3: Pre-Stretch The Cord

Before adding beads, gently stretch the cord a few times.

This helps reduce the chance of the bracelet stretching out after wearing. Be gentle — you want to pre-stretch it, not wrestle it into submission.

Step 4: Secure One End

Place a bead stopper, small clip or piece of tape on one end of the elastic cord. This stops your beads from sliding off while you work.

This step feels small, but it saves a lot of bead-related drama.

Step 5: String Your Beads

Thread the beads onto the cord in your chosen pattern.

Check the length as you go by wrapping the bracelet gently around your wrist. Remember that the bracelet needs to stretch over the hand, so it should not be too tight.

If using large beads, test the fit carefully. Large beads make a bracelet feel smaller than tiny beads.

Step 6: Tie A Secure Knot

When your bracelet is the right size, remove the bead stopper and bring the two ends of the elastic together.

Tie a strong knot. A surgeon’s knot or a square knot with an extra pass is commonly used for stretch bracelets.

Pull the knot firmly, but not so hard that the elastic weakens. Add a tiny dab of clear jewelry glue if you like, then let it dry properly.

Do not flood the knot with glue. A tiny amount is enough. Too much glue can make the knot stiff and messy.

Step 7: Hide The Knot

Once the glue is dry, trim the cord ends carefully.

If possible, slide the knot inside a nearby bead with a larger hole. This gives the bracelet a neater finish and helps protect the knot.

If your beads have small holes, place the knot between two beads and trim carefully.

Step 8: Test The Bracelet

Gently stretch the bracelet a few times and check that the knot holds.

Look for:

  • loose cord ends
  • weak knot
  • beads that pinch
  • bracelet that is too tight
  • bracelet that rolls too much
  • beads with sharp edges

If the bracelet feels too tight, remake it before gifting or wearing. Stretch bracelets need a comfortable fit.

Common Stretch Bracelet Mistakes

Using Cord That Is Too Thin

Thin cord may fit easily through the beads, but it can break more easily, especially with heavy beads.

Making The Bracelet Too Tight

A tight bracelet stretches every time it is worn and may break sooner.

Not Pre-Stretching The Cord

Pre-stretching helps reduce sagging later.

Cutting The Ends Too Soon

Wait until your knot is secure and glue is dry before trimming the cord.

Using Beads With Sharp Holes

Some beads have rough edges around the holes, especially cheaper glass or gemstone beads. These can cut through elastic over time.

Easy Stretch Bracelet Variations

Gemstone Stretch Bracelet

Use gemstone beads in one colour family for a simple boho-style bracelet. Add a small charm or metal spacer for a finished look.

Pearl Stretch Bracelet

Use faux pearls or freshwater pearls with small gold spacers for a pretty bracelet that works well as a handmade gift.

Clay Heishi Bracelet

Clay heishi beads make cheerful, lightweight bracelets. They are perfect for summer colours, teens and stacked bracelet sets.

Memory Bracelet

Use beads from an old broken necklace and turn them into a new stretch bracelet. This is a lovely way to reuse sentimental beads. For another upcycled idea, see this bracelet made from upcycled necklaces.

Birthstone Stretch Bracelet

Use birthstone-coloured beads for birthdays, Mother’s Day or bridesmaid gifts. Pair it with this DIY birthstone necklace for a sweet handmade jewellery set.

How To Package A Stretch Bracelet As A Gift

A stretch bead bracelet makes a lovely small gift. Pop it into a small organza bag, kraft jewellery box or handmade paper envelope.

You can add:

  • a handwritten tag
  • birthstone meaning
  • care instructions
  • matching earrings
  • tiny charm
  • gift box ribbon

If you are making several bracelets for gifts, choose a colour theme and make each one slightly different.

Stretch Bracelet Care Tips

To help a stretch bracelet last longer:

  • roll it gently over the hand instead of pulling hard
  • avoid wearing it in water
  • keep it away from perfume and lotions
  • store it flat or in a jewellery pouch
  • check the knot occasionally

Stretch bracelets are simple, pretty and wonderfully wearable. Once you learn the basic technique, you can make them in endless colours and styles — and yes, this is absolutely an excuse to buy more beads.

Tags

Bangles/Bracelets Beading Beginner Jewelry Making Book Reviews Craft Inspirations Crystal Jewelry Making DIY Necklace DIY Tutorials and Patterns earrings tutorials Felt/Fiber Halloween Jewelry For Men Jewelry Making - General Jewelry making - Supplies Jewelry Making Giveaways Jewelry Making Techniques Jewelry Making Tutorials and Ideas Mixed Media recycled/upcycled Wire Work

RSS More Articles

  • 4 Crayon Cutable or Printable Files for Back to School
  • How to Make a Crochet Vision Board – Plan the Crochet Projects You Actually Want to Make
  • What to Serve with Rotisserie Chicken: 21 Delicious Sides You’ll Want on Repeat
  • Etsy Feature – Moth Pottery Template for Slab Building
  • Hubcap Creatures: Transforming Roadside Finds into Sculptural Wildlife
  • Learning about Georgia for Kids
  • How to Make a Moth Birthday Card
  • DIY Giant Eyeball Lanterns – Creepy Halloween Decoration
  • Designer Spotlight: Artmishka Cross Stitch
  • Freebie Friday – Grungy Pumpkins and Fall Tags Junk Journal Printables

Pick Your Blog

  • Sewing
  • Knitting
  • Quilting
  • Crochet
  • Home & Garden
  • Recycled Crafts
  • Scrapbooking
  • Card Making
  • Polymer Clay
  • Cross-Stitch
  • Edible Crafts
  • Felting
  • Glass Art
  • Indie Crafts
  • Kids Crafts
  • Jewelry Making
  • Lesson Plans
  • Needlework
  • Bath & Body
  • Party Ideas
  • Candle Making
  • DIY Weddings
  • Not Craft
  • Free Craft Projects

Copyright © 2026 · CraftGossip | Start Here | Contact Us | Link to Us | Your Editors | Privacy and affiliate policy