• Home
  • Suggest A DIY
  • DIY Newsletter

Jewelry Making

DIY Jewelry, Beads And Patterns

  • About CraftGossip
  • Our Network
    • Bath & Body Crafts
    • Candle Making Ideas
    • Crochet Ideas
    • Cross Stitch
    • Edible Crafts
    • Felting Patterns
    • Glass Art
    • Home & Garden Ideas
    • Indie Crafts
    • Jewelry Making
    • Kids Crafts
    • Knitting Patterns
    • Lesson Plans
    • Needlework
    • Party Ideas
    • Polymer Clay
    • Quilting Ideas
    • Recycled Crafts
    • Scrapbooking
    • Sewing Patterns
    • Card Making
    • DIY Weddings
    • Not Craft Ideas
  • Giveaways
  • Roundups
  • Store
  • Search

Make your own jump rings

August 15, 2007 by Barbe Saint John

There are lots of ways to make jump rings. Time is money, and it makes sense to buy base metal average size rings rather than make them. But sometimes you need a special size you can’t buy or you just need a few sterling or gold rings and don’t want to pay inflated prices for them..

The easy way to make them is with a dowel or mandrel, wrap a coil and cut it with a saw. You could use double flush cutters-but they are hard to find. Flush cutters leave a pinch of wire on one side which means you spend more time filing down the rings.

 If you want to make rings in bulk, its better to get a tool. I got to use one and I’d LOVE the jewelry tools fairy to bring me one someday.  The Jump Ringer Tool from Connie Fox is GREAT tool but pretty pricey! A more affordable tool is the Koil Kutter.   Either would be a nice addition to a jewelry studio work bench.
«
»

Comments

  1. Gary Helwig says

    September 5, 2007 at 10:12 am

    I am completely self taught in making jewelry so I had to learn the wrong way before I could discover the right way to do things. For making jump rings, I always find that I am out of a jump ring in the metal that I need when I need one, so I usually make my own. I found as you indicated that making a jump ring using a mandrel or dowel and with one cut with a flush cutter did not work because one side was pointed and one side was flat. I now make my jump rings with two cuts for each jump ring. I begin by making a coil on my step jaw pliers and cut the first 1/8″ off the coil, leaving a flush cut on the coil. Then I reverse my cutter and cut the second time at the point on the coil where the wire completes the ring. This leaves a flush cut on both sides of the jump ring and a pointed end on the coil. Making the second jump ring requires two cuts with my flush cutter again.

    Sincerely,
    Gary Helwig
    http://www.wigjig.com

  2. Elizabeth MD says

    March 9, 2009 at 5:06 pm

    Actually the simplest way to do your own jump rings is to cut them with a micro handsaw. That gives you no sharp ends or points

Have you read?

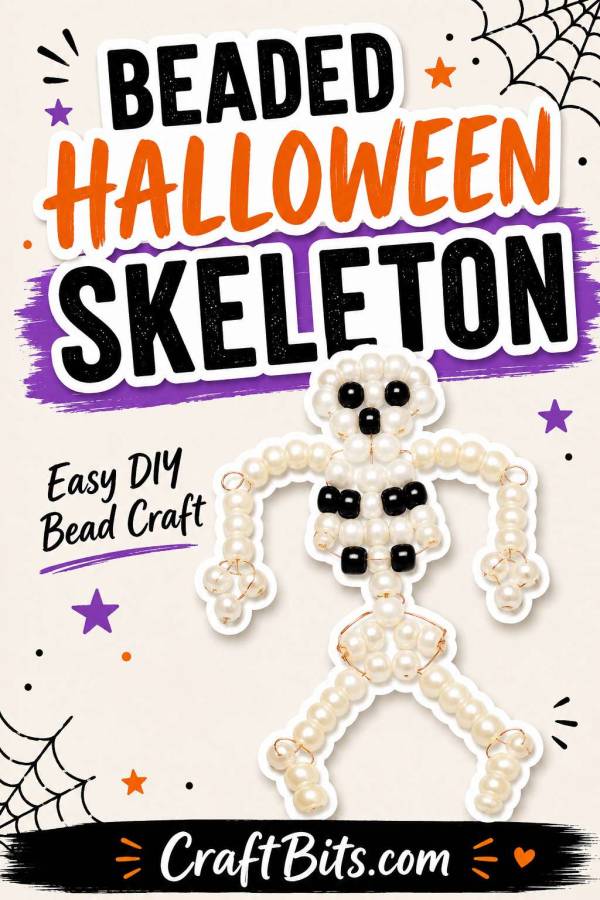
Beaded Halloween Skeleton Craft – A Spooky-Cute Bead Project For Halloween Decorating

If you like your Halloween crafts with a little bit of spooky charm and a whole lot of handmade personality, this Beaded Halloween Skeleton from CraftBits is a fun little project to add to your October crafting list.

This project uses simple supplies — white seed beads, black seed beads, 24-gauge wire or beading thread, scissors, and wire cutters — to create a small beaded skeleton that can be used for Halloween decorations, charms, party favors, or even spooky handmade jewelry. The original tutorial walks you through building the skeleton row by row, starting with a black bead at the top and working through the skull, body, arms, hands, legs, and feet.

What I like about this project is that it has that lovely “old-school craft book” feel. It is not overly complicated, but it does ask you to slow down and follow the bead pattern carefully. This is the sort of Halloween bead craft that is perfect for a quiet afternoon when you want something seasonal but not messy. No glue gun strings across the table, no glitter stuck to the dog, just beads, wire, and a little bit of patience.

The finished skeleton would be cute added to a Halloween keyring, made into a zipper pull, tied onto a treat bag, or hung from a mini Halloween tree. You could also make a batch of them for party decorations or classroom craft swaps. If you enjoy tiny seasonal makes, you might also like browsing the Halloween Crafts section on CraftBits for more spooky little projects to pair with it.

This is a good project for confident beginners who have used seed beads before. Younger crafters may need help with the wire ends and keeping the rows tight, but older kids, teens, and adults who enjoy bead crafts should find it very satisfying. I would suggest using a bead mat or a shallow tray, because seed beads have a special talent for rolling into the one place you cannot reach. Ask me how I know.

For supplies, small packs of black and white seed beads are easy to find, and Amazon is handy for basic beading wire, bead mats, and small jewelry pliers if you are building up a Halloween craft kit. If you prefer more unusual beads or want tiny skull charms to add alongside your skeleton, Etsy can also be a fun place to look for Halloween beading supplies.

This little skeleton is proof that Halloween crafting does not need to be huge or expensive to be fun. Sometimes the best seasonal projects are the small ones you can make in multiples, tuck into gift bags, or hang around the house for a bit of handmade Halloween mischief.

Best for: Halloween bead crafts, spooky handmade charms, beginner-friendly wire bead projects, Halloween party favors, and small seasonal decorations.

Tags

Bangles/Bracelets Beading Beginner Jewelry Making Book Reviews Craft Inspirations Crystal Jewelry Making DIY Necklace DIY Tutorials and Patterns earrings tutorials Felt/Fiber Halloween Jewelry For Men Jewelry Making - General Jewelry making - Supplies Jewelry Making Giveaways Jewelry Making Techniques Jewelry Making Tutorials and Ideas Mixed Media recycled/upcycled Wire Work

RSS feed: More Articles More Articles

  • Spooky Season Sweater Embroidery Design – Etsy Review
  • 5 FREE Bats and Moons in Windows SVG Die Cut Files for Halloween
  • Etsy Feature – Raven Pottery Slab-Building Template
  • The Forest Valley Shawl – Crochet Pattern
  • DIY Pinecone Bouquet: Easy Painted Pinecone Flowers for Fall Decor
  • DIY Milk Jug Halloween Skulls – Recycled Porch Decor
  • Make One Christmas Gift for Everyone: How to Save Money With Bulk Craft Supplies
  • Crocheting Christmas Gifts? Make This Supply Checklist Before You Buy More Yarn
  • DIY Faux Candy Apples: Easy Glossy Fall Decorations
  • 12 Fall Decorations You Can Make from Thrift Store Finds

Pick Your Blog

  • Sewing
  • Knitting
  • Quilting
  • Crochet
  • Home & Garden
  • Recycled Crafts
  • Scrapbooking
  • Card Making
  • Polymer Clay
  • Cross-Stitch
  • Edible Crafts
  • Felting
  • Glass Art
  • Indie Crafts
  • Kids Crafts
  • Jewelry Making
  • Lesson Plans
  • Needlework
  • Bath & Body
  • Party Ideas
  • Candle Making
  • DIY Weddings
  • Not Craft
  • Free Craft Projects

Copyright © 2026 · CraftGossip | Start Here | Contact Us | Link to Us | Your Editors | Privacy and affiliate policy