• Home
  • Suggest A DIY
  • DIY Newsletter

Jewelry Making

DIY Jewelry, Beads And Patterns

  • About CraftGossip
  • Our Network
    • Bath & Body Crafts
    • Candle Making Ideas
    • Crochet Ideas
    • Cross Stitch
    • Edible Crafts
    • Felting Patterns
    • Glass Art
    • Home & Garden Ideas
    • Indie Crafts
    • Jewelry Making
    • Kids Crafts
    • Knitting Patterns
    • Lesson Plans
    • Needlework
    • Party Ideas
    • Polymer Clay
    • Quilting Ideas
    • Recycled Crafts
    • Scrapbooking
    • Sewing Patterns
    • Card Making
    • DIY Weddings
    • Not Craft Ideas
  • Giveaways
  • Roundups
  • Store
  • Search

Should Ear Piercing Of Babies Be Banned?

June 11, 2015 by Shellie Wilson

ear-piercing-for-babies

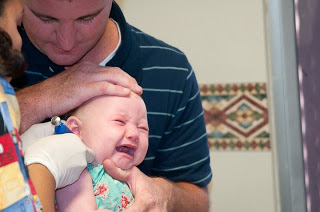
A Storm has erupted across the internet as it was reported in the Mirror (UK Newspaper) that a petition is being signed to ban ear piercing of babies and small children. This picture above is of Little Baby Taylor from 2010. The blog post shares her ear piercing journey, which appears to be very painful and upsetting. She is 5 now and I would love to know whether she remembers it and/or likes her ears being pierced (but does that even matter)?

Some of the people who have signed the petition have made statements like this

  • Smacking a child is abuse, so how come sticking metal rods through their ears is not abuse??!!
  • This is something I, as a parent, decided that it was up to my children, not me, to decide if they wanted to have
  • Pierced ears. To me it is an assault to have this done when a child is too young to even speak, or make this kind of decision.

Some people argue that ear piercing is for “cultural” reasons and this is true, but then so is Female Genital Mutilation and circumcision and they have there own controversial following too.

Should we all just be minding our own business and do what we want? Parent how we think fit? But then where do we draw the line? When does it become OK to step in and help parent. They say it takes a village to raise a child and maybe the internet is just one huge village.

By now you are probably wondering what my stance is on it – I am going to back out on this one and say I don’t have an opinion. I did not choose to pierce my daughter’s ears even though there was strong cultural requirements. She is now 7 and does not want them so it’s just as well I didn’t. She has a very strong personality so I would hate to think that I had manipulated her likes, fashion, style before she had a chance to decide what all those were.

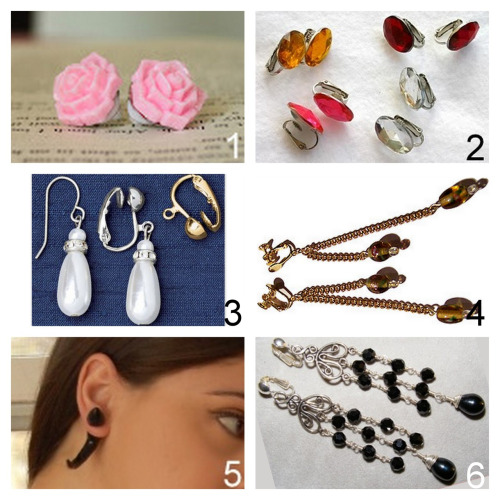
So if you don’t want to pierce your child’s ears then check out these great DIY ideas.

Tattoo Earrings (Removable of course)$6.95 or these Stick on Earrings. However I recall wearing these as a kid and could never keep them on longer than 5 minutes.

696859285981_1__19967.1418147878.1280.1280

DIY Fake Cartilage Earrings

670px-Make-a-Fake-Cartilage-Piercing-That-Looks-Real-Step-3

DIY Clip On Earring Round up

tumblr_m9ajm9l7Ji1qihh0eo1_500

Next Idea:

  • How To Start Jewelry Making: Beginner Tools,…
«
»

Comments

  1. Ann says

    June 11, 2015 at 1:30 pm

    Mind your own damn business. We can very easily go back to piercing our own ears!

  2. Steph says

    June 12, 2015 at 3:45 am

    Child abuse – let them make the decision when they are old to.

  3. amy says

    June 12, 2015 at 10:18 am

    I pierced my now 7 yr old’s ears when she was 6 mos old. She screamed mainly because i was having to hold her when she wanted to crawl around plus because a stranger was touching her (but i know it hurt too). She stopped crying literally as soon as i put her down. Recently one of her earrings fell out and i told her to go get another one so it doesn’t close up. She asked why i got her ears pierced without asking her first. I told her she was a baby and couldn’t talk so i did it thinking she’d like it when she was older. She does love her dangly earrings though.

  4. olycrafter says

    June 12, 2015 at 11:15 am

    In the 80’s, piercing was a sort of a rite of passage. I believe it should be the child’s decision. Plus, you might get to use it as leverage to get a pre-teen to clean their bedroom. 😀

  5. Pat Schwab says

    June 12, 2015 at 9:38 pm

    My girls got their ears pierced when they were older and really wanted them. I used to buy them the cutest stick on earrings that they loved. My doctor does not pierce young children’s ears because he had too many cases of kids screaming and leaving with just on ear pierced and he’s been a pediatrician for over 30 years

  6. Pat Schwab says

    June 12, 2015 at 9:39 pm

    Oops typo, should say one ear not on ear. LOL

  7. dana12559 says

    June 12, 2015 at 11:44 pm

    I used to manage a store that pierced ears. It was horrible doing it to babies and children. Until a child is old enough to decide on their own they shouldn’t get their ears pierced. I once had a woman bring her baby in right after she got her shots and said the baby was going to have a bad day anyway so she thought she’d go ahead and have it done.

  8. Marie Okawa says

    June 14, 2015 at 10:19 am

    I think it’s the parent’s choice whether they do it at a young age. I want to get my baby’s pierced, but my husband wants to wait until she can decide for herself. I’m respecting his wishes, and am going to wait.

Have you read?

Jewelry Making Tools For Beginners: What You Actually Need

Starting a new craft can be exciting, but it can also turn into a shopping rabbit hole very quickly. Jewelry making is no exception. One minute you are buying a packet of beads, and the next you are staring at twenty types of pliers wondering if you need all of them.

The truth is, you do not need a huge collection of tools to start making handmade jewelry. For beginner jewelry making projects like beaded necklaces, bracelets, earrings and charms, a small set of basic tools will take you a long way.

This guide covers the jewelry making tools beginners actually need, what each tool is used for, and which extras are nice to have later. It is designed for real crafters with real budgets and real drawers already full of mysterious supplies.

If you are just starting out, pair this guide with an easy project like this DIY birthstone necklace or these easy silk thread earrings.

1. Chain Nose Pliers

Chain nose pliers are one of the most useful tools in jewelry making. They have flat inner jaws and tapered tips, which makes them ideal for gripping, bending and holding small findings.

Use chain nose pliers for:

  • opening and closing jump rings
  • flattening crimp beads
  • holding small components
  • bending wire
  • adjusting clasps
  • tucking wire ends

If you only buy one pair of pliers to begin with, make it chain nose pliers. They are the workhorse of the jewelry making toolbox.

2. Round Nose Pliers

Round nose pliers have smooth, rounded jaws that taper to a point. They are used for making loops in wire.

Use round nose pliers for:

  • making simple loops
  • making wrapped loops
  • creating eye pins
  • shaping wire
  • making dangles for earrings
  • creating small charms

Round nose pliers are especially useful if you want to make earrings, pendant drops or wire-wrapped bead charms. Once you learn how to make a simple loop, a whole world of handmade jewelry opens up.

3. Flush Cutters Or Jewelry Cutters

Do not use your best sewing scissors for cutting jewelry wire. I say this with the voice of experience and regret.

Jewelry cutters are designed to cut wire cleanly. Flush cutters are especially useful because they leave one side of the cut wire flatter and neater.

Use jewelry cutters for:

  • cutting beading wire
  • trimming head pins
  • cutting eye pins
  • trimming soft jewelry wire
  • cutting chain

Keep your cutters for jewelry only. Cutting memory wire or thick hardware wire can damage delicate cutters, so check what your cutters are designed to handle.

4. Crimping Pliers

Crimping pliers are used to close crimp beads and crimp tubes neatly. You can flatten crimps with chain nose pliers, but crimping pliers create a more rounded, professional finish.

Use crimping pliers for:

  • finishing beaded necklaces
  • finishing beaded bracelets
  • securing clasps
  • shaping crimp tubes
  • making stronger jewelry ends

If you are only making one or two simple projects, chain nose pliers may be enough. But if you plan to make lots of necklaces or bracelets, crimping pliers are worth adding.

For more help with this technique, see our guide on using crimp beads without ruining your necklace once it is published.

5. Bead Board

A bead board is a tray with grooves that help you plan necklace and bracelet designs before stringing them. It usually has measurement marks, which makes it easier to create the right length.

Use a bead board for:

  • planning bead patterns
  • measuring necklace length
  • balancing designs
  • keeping beads from rolling away
  • arranging multiple strands

You do not absolutely need a bead board, but it is very helpful for beginners. If you do not have one, use a tea towel or felt mat on your table. The soft surface helps stop beads from escaping.

6. Bead Mat

A bead mat is a soft surface used for working with beads. It stops beads from rolling and gives you a clean workspace.

Use a bead mat for:

  • seed bead projects
  • sorting small beads
  • planning earrings
  • stringing bracelets
  • keeping beads visible

A simple felt square or soft cloth can work if you are not ready to buy a bead mat. The important thing is to avoid working directly on a hard, shiny table, unless chasing beads across the floor is part of your fitness plan.

7. Bead Stoppers

Bead stoppers are small spring clips that hold beads on wire while you are working. They are simple, cheap and surprisingly useful.

Use bead stoppers for:

  • keeping beads from sliding off wire
  • holding one end of a necklace
  • pausing a project safely
  • working on multi-strand jewelry

You can use masking tape or a small binder clip instead, but bead stoppers are neater and easier to remove.

8. Jump Ring Opener

A jump ring opener is a small ring worn on your finger with grooves for opening jump rings. It is not essential, but it can make repetitive work faster.

Use a jump ring opener for:

  • opening jump rings
  • attaching charms
  • making chain jewelry
  • connecting clasps
  • working on charm bracelets

If you make a lot of charm jewelry, this little tool is handy. If you are only starting out, two pairs of pliers will do the job.

9. Measuring Tape Or Ruler

Measuring matters in jewelry making. Necklaces, bracelets and anklets all need to fit properly.

Use measuring tools for:

  • necklace lengths
  • bracelet sizing
  • anklet sizing
  • chain lengths
  • bead spacing

A soft tape measure is especially useful because it can wrap around the wrist or neck. You can also use a ruler for straight wire and chain measurements.

10. Storage Containers

Beads multiply when you are not looking. One day you have a tidy little packet of beads, and suddenly you have seed beads, clasps, charms, wire, broken necklaces and something labelled “miscellaneous sparkle.”

Good storage makes jewelry making much easier.

Useful storage options include:

  • divided bead boxes
  • small jars
  • zip-top bags
  • labelled tubes
  • drawer organisers
  • tackle boxes
  • stackable craft containers

Sort by bead type, colour or project. There is no perfect system, only the one you will actually use.

Beginner Jewelry Making Supplies To Keep On Hand

Along with tools, it helps to have a few basic supplies ready.

A beginner jewelry making kit might include:

  • beading wire
  • jump rings
  • lobster clasps
  • crimp beads
  • head pins
  • eye pins
  • earring hooks
  • spacer beads
  • small charms
  • mixed beads

If you are buying supplies for the first time, look for a basic jewelry findings kit. These are often more affordable than buying every tiny packet separately.

Tools You Do Not Need Straight Away

Some jewelry tools are useful later, but beginners do not need them immediately.

You can wait before buying:

  • metal stamping tools
  • soldering equipment
  • resin tools
  • bead looms
  • torch tools
  • specialty wire jigs
  • expensive display stands
  • professional polishing machines

Start with simple projects first. Once you know what type of jewelry you enjoy making, it is easier to buy the right tools.

If metal stamping appeals to you, this ImpressArt bracelet making tutorial is a fun place to see how that style of jewelry can look.

Best First Projects For Your New Tools

Once you have your basic jewelry tools, try projects that build your skills gradually.

Good beginner projects include:

  • simple beaded bracelets
  • beaded necklaces with clasps
  • dangle earrings
  • charm bracelets
  • pendant necklaces
  • upcycled jewelry
  • wire bead charms

For a simple wearable project, try this wire necklace tutorial or this DIY wrap jewelry project.

What To Buy First If You Are On A Budget

If you are keeping costs down, start with:

  • chain nose pliers
  • round nose pliers
  • jewelry cutters
  • flexible beading wire
  • crimp beads
  • clasps
  • jump rings
  • beads

You can add a bead board, crimping pliers and storage boxes later.

A beginner jewelry making tool kit can be a good value if it includes decent pliers and cutters. Avoid very flimsy tools if possible, because they can make jewelry making more frustrating than it needs to be.

A Practical Beginner Tip

Do not buy every tool before making your first project. Make a simple necklace, bracelet or pair of earrings first, then see what you actually enjoy.

Some people fall in love with seed beads. Some adore wire wrapping. Some just want to make quick earrings from leftover beads. Your tool collection should grow around the kind of jewelry you actually want to make.

That is the nice thing about beginner jewelry making. You can start small, learn as you go, and still make something pretty enough to wear.


Tags

Bangles/Bracelets Beading Beginner Jewelry Making Book Reviews Craft Inspirations Crystal Jewelry Making DIY Necklace DIY Tutorials and Patterns earrings tutorials Felt/Fiber Halloween Jewelry For Men Jewelry Making - General Jewelry making - Supplies Jewelry Making Giveaways Jewelry Making Techniques Jewelry Making Tutorials and Ideas Mixed Media recycled/upcycled Wire Work

RSS More Articles

  • Everything You Need to Know About Embroidery Hoops
  • Needle Felting Fairy Tutorial by Santa Meada
  • Printable Stickers for Journals and Planners – Self Care
  • Stitch Your Favorite Fruit on a Sweater
  • 12 Color Wheel Inspired Scrapbook Layouts
  • Crafts With Old Bricks: Creative Ways To Upcycle Leftover Bricks
  • How To Make A Milk Mache Molding Compound
  • The 5 Outlet Placement Mistakes You Don’t Want to Make
  • Celebrate the Spirit of the Southwest with These Stunning Indian Navajo Tribal Quilt Patterns
  • Pricing Handmade Sewing Items Without Undervaluing Yourself

Pick Your Blog

  • Sewing
  • Knitting
  • Quilting
  • Crochet
  • Home & Garden
  • Recycled Crafts
  • Scrapbooking
  • Card Making
  • Polymer Clay
  • Cross-Stitch
  • Edible Crafts
  • Felting
  • Glass Art
  • Indie Crafts
  • Kids Crafts
  • Jewelry Making
  • Lesson Plans
  • Needlework
  • Bath & Body
  • Party Ideas
  • Candle Making
  • DIY Weddings
  • Not Craft
  • Free Craft Projects

Copyright © 2026 · CraftGossip | Start Here | Contact Us | Link to Us | Your Editors | Privacy and affiliate policy