• Home
  • Suggest A DIY
  • DIY Newsletter

Jewelry Making

DIY Jewelry, Beads And Patterns

  • About CraftGossip
  • Our Network
    • Bath & Body Crafts
    • Candle Making Ideas
    • Crochet Ideas
    • Cross Stitch
    • Edible Crafts
    • Felting Patterns
    • Glass Art
    • Home & Garden Ideas
    • Indie Crafts
    • Jewelry Making
    • Kids Crafts
    • Knitting Patterns
    • Lesson Plans
    • Needlework
    • Party Ideas
    • Polymer Clay
    • Quilting Ideas
    • Recycled Crafts
    • Scrapbooking
    • Sewing Patterns
    • Card Making
    • DIY Weddings
    • Not Craft Ideas
  • Giveaways
  • Roundups
  • Store
  • Search

The Naughty Secretary Club: The Working Girls Guide to Handmade Jewerly Book Review

August 17, 2008 by Barbe Saint John

The Naughty Secretary Club: The Working Girls Guide to Handmade Jewelry by Jennifer Perkins

  • Paperback: 144 pages
  • Publisher: North Light Books (August 11, 2008)
  • Language: English
  • ISBN-10: 1600611168
  • ISBN-13: 978-1600611162

I will preface this by being completely honest –  its real hard to be unbiased when reviewing a book when A: the author is a friend and B: you have a love for the subject matter that rivals the people on InFANity. So I’ll “keep it real” like as I always do.  I have one word for this SQUEEE!!!!!!!!!!!! Jennifer is also Craft Gossip’s Craft Artist Life  editor. You should visit her section & read all the cool interviews she has up over there.

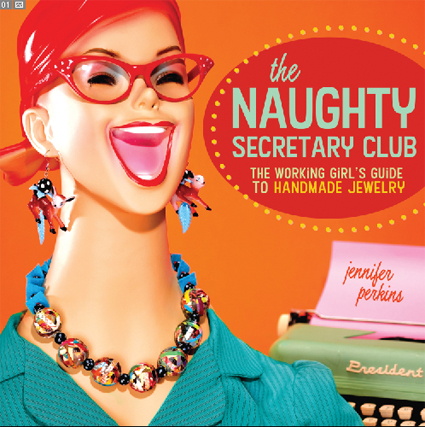
I got the package as I was going out the door with my dog. I quickly ripped it open as I was walking and it was love at first sight. How can you NOT love it?? The colors, the laughing mannequin with perfect red cat eye glasses-SQUEE!!!! But hang on,  there is more to love, trust me. This first glance is just the tip of the color saturated iceburg that awaits you inside its glossy covers-so much so, my dog and I made an emergency pitstop at Starbucks so I could sit and go thru this book right there and then.

Open it up and be prepared for a full blown blast of colors, kitsch and cleverness.  This is not a book for the shy or conservative jewelry maker. Jennifer wears her heart on her sleeve, a watch on her head and pencils in her ears-and she’ll make you want too as well!

Packed with ideas, tips and tricks on how to turn vintage junque into wearable art I really feel this book will appeal to just about everyone.  Even if you can’t imagine wearing little plastic deer in your ear (hey, I’m a poet and didn’t know it!), you will get a ton of inspiration and tricks in the book that you can use with whatever your style is.

The book begins an introduction, supplies, tools and the definition of the skill levels of the projects. Remember because this is all about using found objects you are not limited by what you have or don’t have at home.  This book is ALL about being creative and having fun. The projects are broken up into 3 sections: A case of the Mondays, Hump Day and TGIF with 30 projects total and unlimited ways to expand upon them. While its hard to nail it down to just a FEW, I’ll pick three of the top ones that I love especially:  Thank you for Calling bangle (I love those purses too!), Tied Down Brooch and the Specs Appeal Necklace (super clever). Sprinkled through out are little “take a memo”  sidebars with fun info, trivia and tips.

Its a great book for beginners as well the experienced jewelrymaker who wants to expand their boundaries and push outside their boxes. Its a delight to look at and read.

Next Idea:

  • Easy Jewelry Making Projects That Sell Well at Craft Fairs
«
»

Have you read?

Jewelry Making Tools For Beginners: What You Actually Need

Starting a new craft can be exciting, but it can also turn into a shopping rabbit hole very quickly. Jewelry making is no exception. One minute you are buying a packet of beads, and the next you are staring at twenty types of pliers wondering if you need all of them.

The truth is, you do not need a huge collection of tools to start making handmade jewelry. For beginner jewelry making projects like beaded necklaces, bracelets, earrings and charms, a small set of basic tools will take you a long way.

This guide covers the jewelry making tools beginners actually need, what each tool is used for, and which extras are nice to have later. It is designed for real crafters with real budgets and real drawers already full of mysterious supplies.

If you are just starting out, pair this guide with an easy project like this DIY birthstone necklace or these easy silk thread earrings.

1. Chain Nose Pliers

Chain nose pliers are one of the most useful tools in jewelry making. They have flat inner jaws and tapered tips, which makes them ideal for gripping, bending and holding small findings.

Use chain nose pliers for:

  • opening and closing jump rings
  • flattening crimp beads
  • holding small components
  • bending wire
  • adjusting clasps
  • tucking wire ends

If you only buy one pair of pliers to begin with, make it chain nose pliers. They are the workhorse of the jewelry making toolbox.

2. Round Nose Pliers

Round nose pliers have smooth, rounded jaws that taper to a point. They are used for making loops in wire.

Use round nose pliers for:

  • making simple loops
  • making wrapped loops
  • creating eye pins
  • shaping wire
  • making dangles for earrings
  • creating small charms

Round nose pliers are especially useful if you want to make earrings, pendant drops or wire-wrapped bead charms. Once you learn how to make a simple loop, a whole world of handmade jewelry opens up.

3. Flush Cutters Or Jewelry Cutters

Do not use your best sewing scissors for cutting jewelry wire. I say this with the voice of experience and regret.

Jewelry cutters are designed to cut wire cleanly. Flush cutters are especially useful because they leave one side of the cut wire flatter and neater.

Use jewelry cutters for:

  • cutting beading wire
  • trimming head pins
  • cutting eye pins
  • trimming soft jewelry wire
  • cutting chain

Keep your cutters for jewelry only. Cutting memory wire or thick hardware wire can damage delicate cutters, so check what your cutters are designed to handle.

4. Crimping Pliers

Crimping pliers are used to close crimp beads and crimp tubes neatly. You can flatten crimps with chain nose pliers, but crimping pliers create a more rounded, professional finish.

Use crimping pliers for:

  • finishing beaded necklaces
  • finishing beaded bracelets
  • securing clasps
  • shaping crimp tubes
  • making stronger jewelry ends

If you are only making one or two simple projects, chain nose pliers may be enough. But if you plan to make lots of necklaces or bracelets, crimping pliers are worth adding.

For more help with this technique, see our guide on using crimp beads without ruining your necklace once it is published.

5. Bead Board

A bead board is a tray with grooves that help you plan necklace and bracelet designs before stringing them. It usually has measurement marks, which makes it easier to create the right length.

Use a bead board for:

  • planning bead patterns
  • measuring necklace length
  • balancing designs
  • keeping beads from rolling away
  • arranging multiple strands

You do not absolutely need a bead board, but it is very helpful for beginners. If you do not have one, use a tea towel or felt mat on your table. The soft surface helps stop beads from escaping.

6. Bead Mat

A bead mat is a soft surface used for working with beads. It stops beads from rolling and gives you a clean workspace.

Use a bead mat for:

  • seed bead projects
  • sorting small beads
  • planning earrings
  • stringing bracelets
  • keeping beads visible

A simple felt square or soft cloth can work if you are not ready to buy a bead mat. The important thing is to avoid working directly on a hard, shiny table, unless chasing beads across the floor is part of your fitness plan.

7. Bead Stoppers

Bead stoppers are small spring clips that hold beads on wire while you are working. They are simple, cheap and surprisingly useful.

Use bead stoppers for:

  • keeping beads from sliding off wire
  • holding one end of a necklace
  • pausing a project safely
  • working on multi-strand jewelry

You can use masking tape or a small binder clip instead, but bead stoppers are neater and easier to remove.

8. Jump Ring Opener

A jump ring opener is a small ring worn on your finger with grooves for opening jump rings. It is not essential, but it can make repetitive work faster.

Use a jump ring opener for:

  • opening jump rings
  • attaching charms
  • making chain jewelry
  • connecting clasps
  • working on charm bracelets

If you make a lot of charm jewelry, this little tool is handy. If you are only starting out, two pairs of pliers will do the job.

9. Measuring Tape Or Ruler

Measuring matters in jewelry making. Necklaces, bracelets and anklets all need to fit properly.

Use measuring tools for:

  • necklace lengths
  • bracelet sizing
  • anklet sizing
  • chain lengths
  • bead spacing

A soft tape measure is especially useful because it can wrap around the wrist or neck. You can also use a ruler for straight wire and chain measurements.

10. Storage Containers

Beads multiply when you are not looking. One day you have a tidy little packet of beads, and suddenly you have seed beads, clasps, charms, wire, broken necklaces and something labelled “miscellaneous sparkle.”

Good storage makes jewelry making much easier.

Useful storage options include:

  • divided bead boxes
  • small jars
  • zip-top bags
  • labelled tubes
  • drawer organisers
  • tackle boxes
  • stackable craft containers

Sort by bead type, colour or project. There is no perfect system, only the one you will actually use.

Beginner Jewelry Making Supplies To Keep On Hand

Along with tools, it helps to have a few basic supplies ready.

A beginner jewelry making kit might include:

  • beading wire
  • jump rings
  • lobster clasps
  • crimp beads
  • head pins
  • eye pins
  • earring hooks
  • spacer beads
  • small charms
  • mixed beads

If you are buying supplies for the first time, look for a basic jewelry findings kit. These are often more affordable than buying every tiny packet separately.

Tools You Do Not Need Straight Away

Some jewelry tools are useful later, but beginners do not need them immediately.

You can wait before buying:

  • metal stamping tools
  • soldering equipment
  • resin tools
  • bead looms
  • torch tools
  • specialty wire jigs
  • expensive display stands
  • professional polishing machines

Start with simple projects first. Once you know what type of jewelry you enjoy making, it is easier to buy the right tools.

If metal stamping appeals to you, this ImpressArt bracelet making tutorial is a fun place to see how that style of jewelry can look.

Best First Projects For Your New Tools

Once you have your basic jewelry tools, try projects that build your skills gradually.

Good beginner projects include:

  • simple beaded bracelets
  • beaded necklaces with clasps
  • dangle earrings
  • charm bracelets
  • pendant necklaces
  • upcycled jewelry
  • wire bead charms

For a simple wearable project, try this wire necklace tutorial or this DIY wrap jewelry project.

What To Buy First If You Are On A Budget

If you are keeping costs down, start with:

  • chain nose pliers
  • round nose pliers
  • jewelry cutters
  • flexible beading wire
  • crimp beads
  • clasps
  • jump rings
  • beads

You can add a bead board, crimping pliers and storage boxes later.

A beginner jewelry making tool kit can be a good value if it includes decent pliers and cutters. Avoid very flimsy tools if possible, because they can make jewelry making more frustrating than it needs to be.

A Practical Beginner Tip

Do not buy every tool before making your first project. Make a simple necklace, bracelet or pair of earrings first, then see what you actually enjoy.

Some people fall in love with seed beads. Some adore wire wrapping. Some just want to make quick earrings from leftover beads. Your tool collection should grow around the kind of jewelry you actually want to make.

That is the nice thing about beginner jewelry making. You can start small, learn as you go, and still make something pretty enough to wear.


Tags

Bangles/Bracelets Beading Beginner Jewelry Making Book Reviews Craft Inspirations Crystal Jewelry Making DIY Necklace DIY Tutorials and Patterns earrings tutorials Felt/Fiber Halloween Jewelry For Men Jewelry Making - General Jewelry making - Supplies Jewelry Making Giveaways Jewelry Making Techniques Jewelry Making Tutorials and Ideas Mixed Media recycled/upcycled Wire Work

RSS More Articles

  • Everything You Need to Know About Embroidery Hoops
  • Needle Felting Fairy Tutorial by Santa Meada
  • Printable Stickers for Journals and Planners – Self Care
  • Stitch Your Favorite Fruit on a Sweater
  • 12 Color Wheel Inspired Scrapbook Layouts
  • Crafts With Old Bricks: Creative Ways To Upcycle Leftover Bricks
  • How To Make A Milk Mache Molding Compound
  • The 5 Outlet Placement Mistakes You Don’t Want to Make
  • Celebrate the Spirit of the Southwest with These Stunning Indian Navajo Tribal Quilt Patterns
  • Pricing Handmade Sewing Items Without Undervaluing Yourself

Pick Your Blog

  • Sewing
  • Knitting
  • Quilting
  • Crochet
  • Home & Garden
  • Recycled Crafts
  • Scrapbooking
  • Card Making
  • Polymer Clay
  • Cross-Stitch
  • Edible Crafts
  • Felting
  • Glass Art
  • Indie Crafts
  • Kids Crafts
  • Jewelry Making
  • Lesson Plans
  • Needlework
  • Bath & Body
  • Party Ideas
  • Candle Making
  • DIY Weddings
  • Not Craft
  • Free Craft Projects

Copyright © 2026 · CraftGossip | Start Here | Contact Us | Link to Us | Your Editors | Privacy and affiliate policy