• Home
  • Suggest A DIY
  • DIY Newsletter

Jewelry Making

DIY Jewelry, Beads And Patterns

  • About CraftGossip
  • Our Network
    • Bath & Body Crafts
    • Candle Making Ideas
    • Crochet Ideas
    • Cross Stitch
    • Edible Crafts
    • Felting Patterns
    • Glass Art
    • Home & Garden Ideas
    • Indie Crafts
    • Jewelry Making
    • Kids Crafts
    • Knitting Patterns
    • Lesson Plans
    • Needlework
    • Party Ideas
    • Polymer Clay
    • Quilting Ideas
    • Recycled Crafts
    • Scrapbooking
    • Sewing Patterns
    • Card Making
    • DIY Weddings
    • Not Craft Ideas
  • Giveaways
  • Roundups
  • Store
  • Search

Handmade Ornament Inspirations

November 17, 2012 by Stacie Hooder

Christmas ornaments made from repurposed CDs and used holiday cards.

As I’ve been working on my entry for Michaels Dream Tree Challenge, I realized many of my most cherished ornaments are ones that have been handmade and given to me as gifts or personalized ornaments that I’ve made myself. Here’s a round-up of some of my favorite ideas.
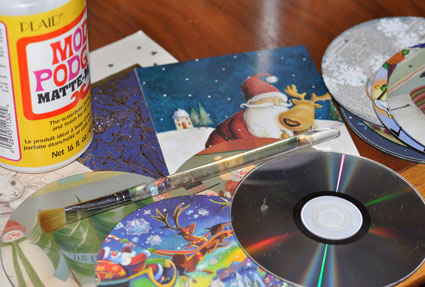
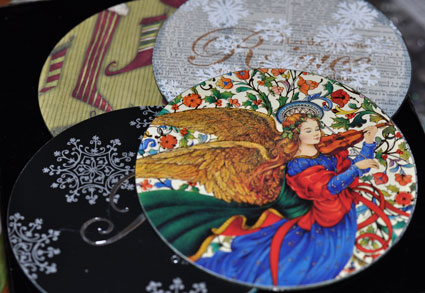
1. Upcycled CDs

I love to receive beautiful holiday cards and really hate to throw them out. One way to keep, display and enjoy them is to make ornaments using old compact disks and ModPodge. Another way to make recycled CDs into ornaments is to use rubber stamps, scrapbook paper and embellishments.

Make ornaments from old CDs with holiday cards and Mod Podge.

Make ornaments from old CDs with holiday cards and Mod Podge.

Create ornaments from upcycled CDs using scrapbook paper, rubber stamps and embellishments.

2. Felt and fabric ornaments

Fabric scaps, buttons and ribbon make pretty and colorful ornaments.
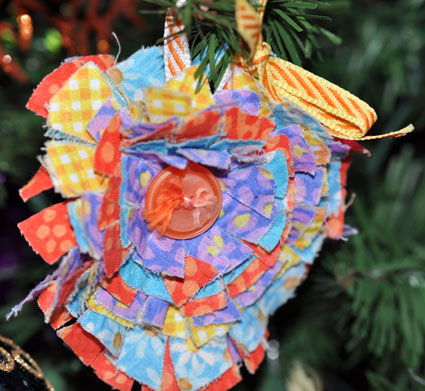
Needlework Editor Denise Felton created this beautiful ornament with fabric scraps, ribbon and a colorful button.

Felt and beaded ornament

Denise Felton's beaded heart felt ornaments.
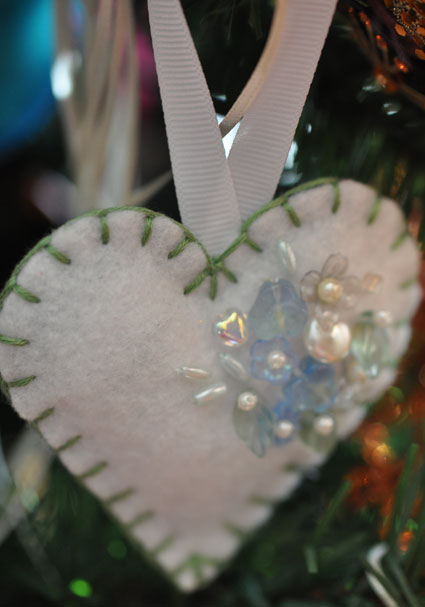
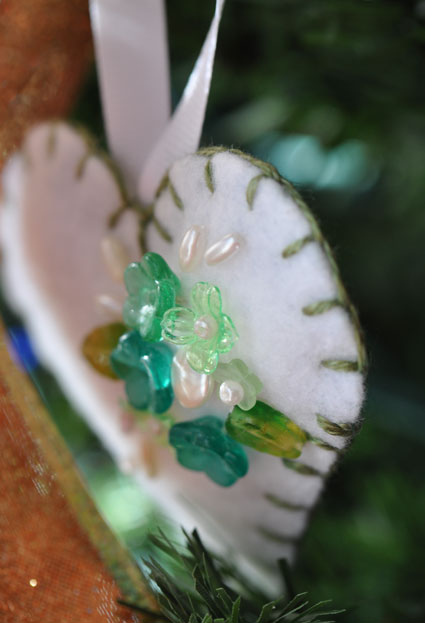
These plush felt beaded heart ornaments were also created by Denise.

Felt horse head ornament with googly eyes. 
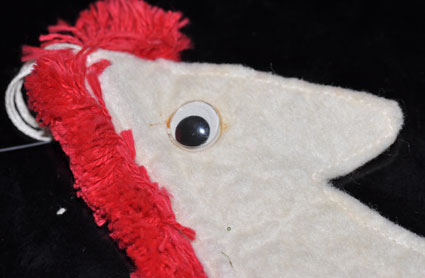
My Aunt Donna created this felt ornament way back in the early ’70s!

Taco Eve ornament made of felt.
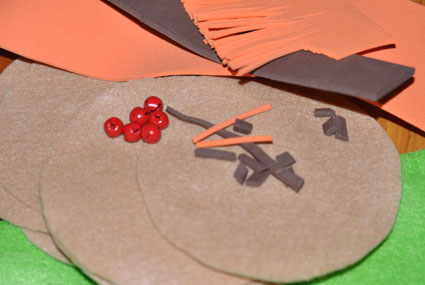
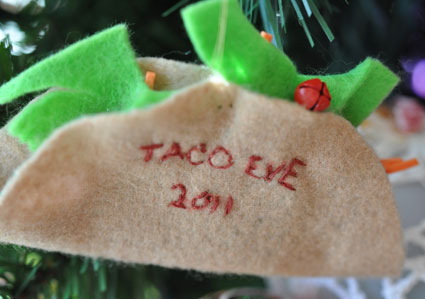
One of our family traditions is to celebrate Christmas Eve with a taco feast. We affectionately call this tradition “Taco Eve.” Here’s an ornament I made of felt, foam and tiny red jingle bells.

Pieces I used to assemble my felt Taco Eve ornament.

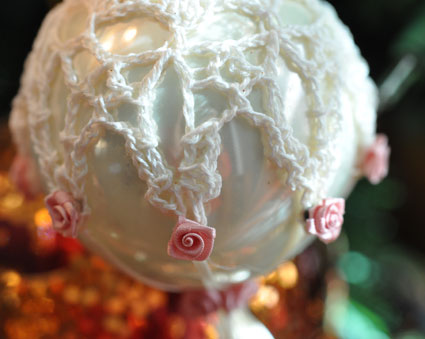
3. Crochet Ornaments

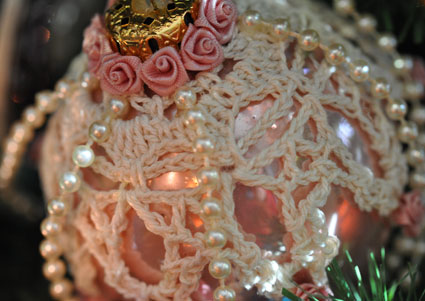
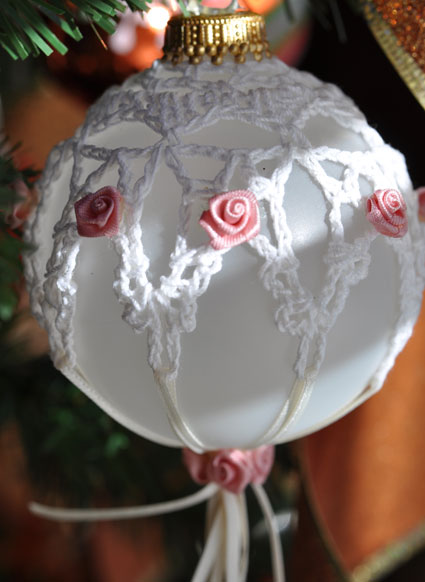
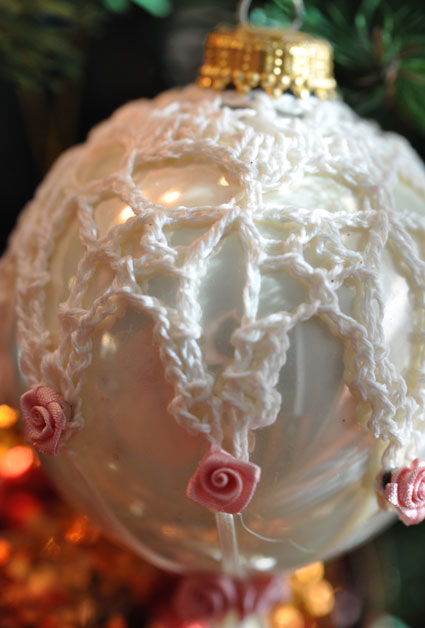
In addition to pretty snowflakes and wreaths my Grandma Ila used to crochet, she and I once collaborated to make these most cherished heirloom ornaments.
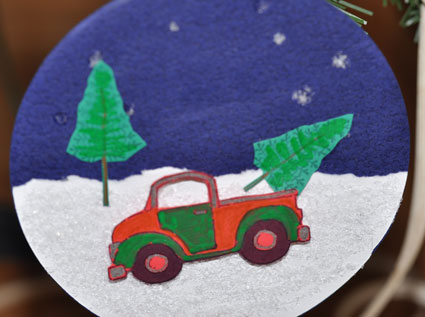
Victorian style crochet ornament covers

Victorian style crochet ornament covers

Victorian style crochet ornament covers

Victorian style crochet ornament covers

Victorian style crochet ornament covers

4. Paper ornaments

Paper ornament cut using a Wishblade and paper punches.

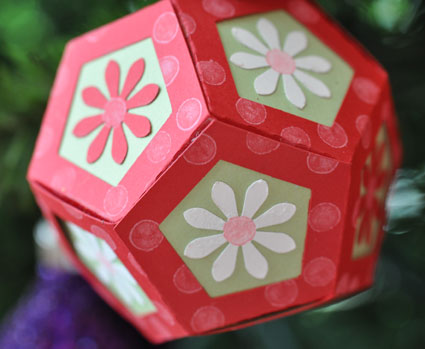
Scrapbook supplies make wonderful ornaments. This beauty was designed by Sewing Editor Anne Weaver. The hollow ornament was cut using a Wishblade, stamped, assembled and embellished with punched paper.

tiny paper take out box ornament
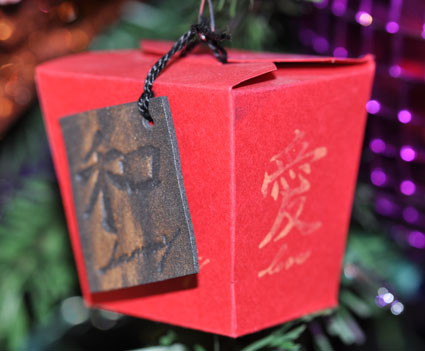
Created by Lisa Bylander, this tiny take out box was hand stamped and assembled.
Coin envelope ornaments designed and handpainted by Graphic Artist Jann Bell.
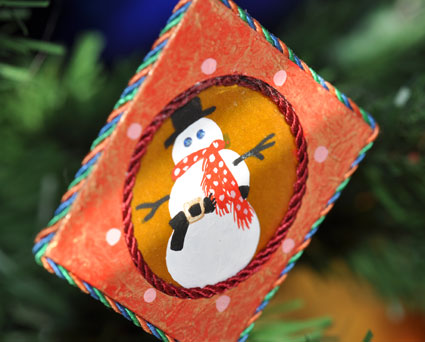
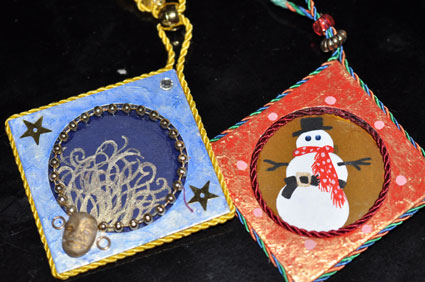
These exquisitely hand-painted ornaments are made from coin collecting envelopes, vellum and tiny braided cord. Designed and created by Graphic Artist Jann Bell, these ornaments are particularly beautiful when illuminated by the tree lights.

Another of Jann's beautiful hand painted coin envelope ornaments.

Detail of Jann's hand painted snowman with crystal blue eyes.

5. Salt Dough

Antique salt dough ornaments

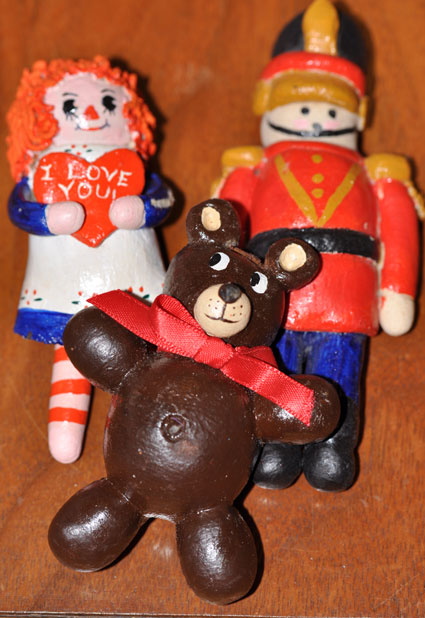
These ornaments have been retired from duty but are a testament to how hardy salt dough is. These examples were made in the 80s!

Salt dough Taco Eve ornament

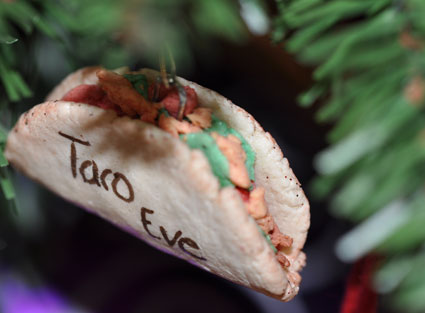
Another Taco Eve ornament. Get the recipe for salt dough and my tutorial for wearable holiday cheer!

Salt dough ornaments

Salt dough ornament

salt dough ornament

salt dough ornament

salt dough ornament

salt dough ornament
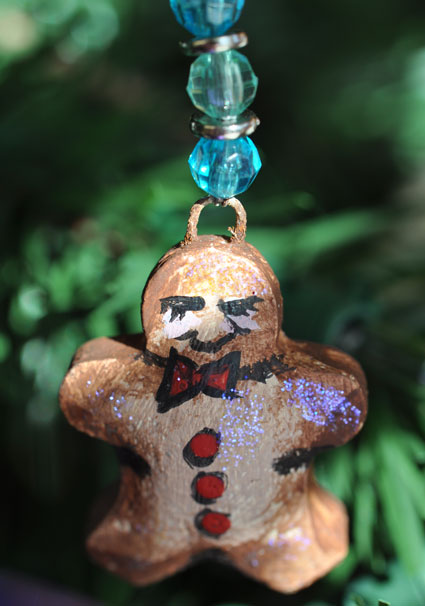
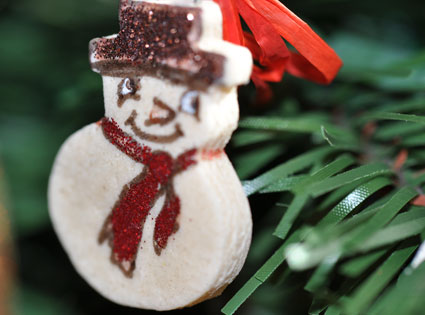
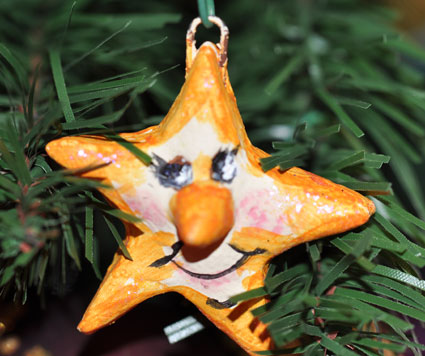
Cookie cutters + salt dough = endless possibilities.

salt dough ornament

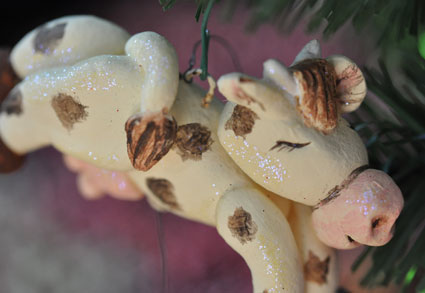
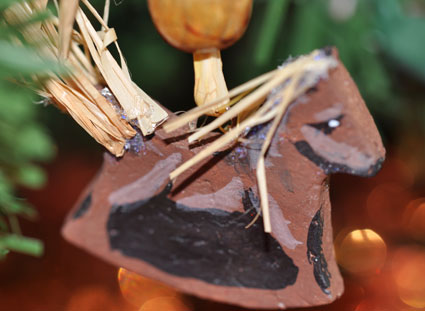
Salt dough can also be used to hand build thin 3D shapes.

What are your favorite handmade ornaments?


Next Idea:

  • Easy Jewelry Making Projects That Sell Well at Craft Fairs
«
»

Comments

  1. DeeAnn S says

    November 18, 2012 at 7:54 am

    Fantastic ideas, but I absolutely love your crochet ornaments! Beautiful! I’d love to try making them to give as Christmas gifts. Thanks for sharing. 🙂

Trackbacks

  1. Ornament Showplace Blog says:
    November 17, 2012 at 10:42 pm

    Studios Ornament Cards…

    […] way to make recycled CDs into ornaments is to use rubber stamps, scrapbook pape […]…

  2. CraftCrave | Blog | Free Handcraft Items or Tutorials (large): Monday, 19 Nov 2012 says:
    November 19, 2012 at 4:21 am

    […] Handmade Ornament Inspirations – 1 freebie(s)? […]

Have you read?

How To Make Matching Beaded Earrings From Leftover Beads

If you have just finished making a beaded necklace or bracelet, there is a very good chance you have a few leftover beads sitting on the table. Not enough for another big project, but far too pretty to put back in the bead box and forget about.

That is exactly when you make earrings.

Matching beaded earrings are one of the easiest beginner jewelry making projects, and they are perfect for using up small numbers of beads. You only need a few beads, two head pins or eye pins, two earring hooks and basic jewelry pliers.

This tutorial shows you how to make simple beaded dangle earrings using leftover beads. They are quick, beginner-friendly and a lovely way to turn scraps from a necklace or bracelet project into a complete handmade jewelry set.

If you enjoy easy earring projects, you may also like these easy silk thread earrings or this DIY handmade beaded dangle charm earrings tutorial.

Why Leftover Beads Are Perfect For Earrings

Earrings do not need many beads, which makes them ideal for using up tiny leftovers from other projects. Two pearls, a few seed beads, a pair of glass beads or a couple of gemstone chips can become a pretty matching set.

This is especially useful if you have made a necklace or bracelet and want earrings that coordinate without being too matchy-matchy. A little hint of the same colour is usually enough.

It is also a great project for those beads that are too special to waste but too few to do anything major with. We all have those beads. The “I’ll save these for something” beads. This is the something.

Supplies You Will Need

To make one pair of simple beaded earrings, you will need:

  • 2 matching feature beads
  • smaller beads or spacers, optional
  • 2 head pins or eye pins
  • 2 earring hooks
  • 2 small jump rings, optional
  • round nose pliers
  • chain nose pliers
  • jewelry cutters

If your ears are sensitive, use hypoallergenic, sterling silver, surgical steel or nickel-free earring hooks.

What Is A Head Pin?

A head pin is a straight piece of wire with a flat end or decorative end that stops beads from sliding off. It is used to make bead drops and dangles.

You thread beads onto the head pin, make a loop at the top, and attach it to an earring hook.

What Is An Eye Pin?

An eye pin is similar, but instead of a flat end it has a loop at one end. Eye pins are useful when you want to connect beads together or add a charm underneath.

For the simplest beginner earrings, start with head pins.

Choosing Beads For Matching Earrings

Choose beads that are light enough to wear comfortably. Earrings should not pull on the ear.

Good bead choices include:

  • small glass beads
  • pearls
  • seed beads
  • gemstone chips
  • crystal beads
  • wooden beads
  • metal spacers
  • acrylic beads

For matching earrings, choose two similar beads for the main feature. They do not have to be perfectly identical, especially with handmade or natural beads, but they should feel balanced.

If you are using beads from a necklace project, use one or two of the same beads from the necklace and add a small spacer for a coordinated look.

Step 1: Plan Your Earring Design

Lay out the beads for each earring side by side.

For a simple design, try:

  • one pearl and one spacer
  • one gemstone bead with seed beads above and below
  • three small beads stacked together
  • one glass bead with a metal spacer
  • one charm with a bead above it

Keep both earrings similar in length and weight. If one earring is much heavier than the other, it will feel odd when worn.

Step 2: Add Beads To The Head Pin

Thread your beads onto the head pin.

The bottom bead should be large enough that it does not slip over the flat end of the head pin. If the bead hole is too large, add a small seed bead or spacer first.

Leave enough wire at the top to make a loop. Around 1 cm is usually enough for a simple loop, but beginners may prefer to leave a little more and trim later.

Step 3: Bend The Wire

Using chain nose pliers, bend the wire at a right angle just above the top bead.

This creates the start of the loop and helps the bead dangle hang neatly.

Step 4: Make A Simple Loop

Hold the end of the wire with round nose pliers and roll it back towards the beads to form a loop.

The loop should be closed enough that it will not slip off the earring hook. If there is extra wire, trim it carefully with jewelry cutters.

This step may take a little practice. Your first loop may look a bit wonky. That is perfectly normal. Mine certainly did, and I still wore them.

Step 5: Attach The Bead Dangle To The Earring Hook

Open the loop at the bottom of the earring hook or use a small jump ring.

Always open jump rings by twisting sideways, not pulling apart. This helps them close neatly again.

Slide the bead dangle onto the hook or jump ring, then close it securely with pliers.

Repeat for the second earring.

Step 6: Check The Pair

Hold both earrings up together and check that they are the same length.

Make sure:

  • the loops are closed
  • the beads are secure
  • the hooks face the same direction
  • the earrings hang evenly
  • no wire ends are sharp

If one loop is slightly larger than the other, adjust it gently with pliers.

Easy Beaded Earring Variations

Pearl Drop Earrings

Use one pearl on each head pin with a tiny gold or silver spacer above it. Simple, classic and perfect for gifts.

Seed Bead Stack Earrings

Stack several seed beads in coordinating colours. These are lightweight and great for using up tiny leftovers.

Gemstone Chip Earrings

Use small gemstone chips for a natural boho look. Add a metal spacer at the top or bottom to make the design feel finished.

Charm And Bead Earrings

Add a charm underneath a small bead using an eye pin or jump ring. This works beautifully for seasonal earrings, initials or themed gifts.

For a fun seasonal idea, see these DIY Halloween blood drip earrings.

Mismatched But Coordinated Earrings

Use different beads in the same colour family. This gives a handmade, artsy look without needing perfect pairs.

Tips For Making Earrings Look More Professional

Use matching metal finishes. Gold hooks, gold pins and gold spacers look neater together.

Keep the earrings lightweight. Heavy earrings may look dramatic, but they are not always comfortable.

Make sure loops are fully closed. This keeps the bead dangle from slipping off.

Trim wire neatly. Sharp wire ends can catch in hair, scarves or jumpers.

Use good quality earring hooks if gifting. A pretty handmade earring deserves a finding that feels comfortable and safe.

Beginner Mistakes To Avoid

Do not make the earrings too heavy. If the bead feels heavy in your hand, it will probably feel heavy on your ear.

Do not leave loops open. Even a tiny gap can let the dangle slip off.

Do not cut the wire too short before making the loop. It is much easier to trim extra wire than to make a loop with barely anything to hold.

Do not worry if the first pair is not perfect. Simple loop making is a skill, and it improves quickly.

Turning Earrings Into A Matching Set

If you have made a necklace or bracelet, use the same beads in the earrings for a coordinated handmade set.

Try these combinations:

  • pearl necklace with pearl drop earrings
  • gemstone bracelet with tiny gemstone earrings
  • seed bead necklace with stacked seed bead earrings
  • charm bracelet with matching charm earrings
  • birthstone necklace with birthstone earrings

For another handmade gift idea, try this DIY birthstone necklace. Birthstone jewellery always feels thoughtful, even when it is simple to make.

Why This Is Such A Useful Beginner Project

Beaded earrings are quick, inexpensive and perfect for practising basic jewelry making skills. You will learn how to use head pins, make simple loops, open jump rings and attach earring hooks.

You can make a pair in under an hour, and once you get the hang of it, you may find yourself making earrings from every leftover bead on the table.

Which is not a bad problem to have, really. There are worse things than a little box full of handmade earrings.

Tags

Bangles/Bracelets Beading Beginner Jewelry Making Book Reviews Craft Inspirations Crystal Jewelry Making DIY Necklace DIY Tutorials and Patterns earrings tutorials Felt/Fiber Halloween Jewelry For Men Jewelry Making - General Jewelry making - Supplies Jewelry Making Giveaways Jewelry Making Techniques Jewelry Making Tutorials and Ideas Mixed Media recycled/upcycled Wire Work

RSS More Articles

  • Knit a Pet Bed on a Knitting Machine
  • How To Sew A Throw Pillow: Easy Pillow Cover Tutorials For Beginners
  • Printable Stickers for Journals and Planners – Household Chores
  • Activities for Teaching the Alphabet
  • 10 Crafty Friends Scrapbook Layout Ideas
  • Book Review Wednesday: Air-Dry Clay Making Handbook
  • The Air Fryer Queen by Steph de Sousa Review: A Colourful Cookbook That Feels as Fun as It Looks
  • Bulky Velour Poncho – Free Crochet Pattern
  • Free Summer BBQ Digital Stamps for Card Making and Paper Crafts
  • Why You Need A Stick Blender For Soap Making

Pick Your Blog

  • Sewing
  • Knitting
  • Quilting
  • Crochet
  • Home & Garden
  • Recycled Crafts
  • Scrapbooking
  • Card Making
  • Polymer Clay
  • Cross-Stitch
  • Edible Crafts
  • Felting
  • Glass Art
  • Indie Crafts
  • Kids Crafts
  • Jewelry Making
  • Lesson Plans
  • Needlework
  • Bath & Body
  • Party Ideas
  • Candle Making
  • DIY Weddings
  • Not Craft
  • Free Craft Projects

Copyright © 2026 · CraftGossip | Start Here | Contact Us | Link to Us | Your Editors | Privacy and affiliate policy