
There is something wonderfully dangerous about Christmas craft supplies. You start out looking for one tiny piece of festive paper, and suddenly you are elbow-deep in glitter, ribbon scraps, old gift tags, and that mysterious packet of tiny bells you bought three years ago because they were “too cute to leave behind.”
Christmas resin jewelry is one of those projects that lets you use all those little festive bits in a way that actually looks polished. We are talking glossy handmade pendants, cute Christmas earrings, tiny resin charms, brooches, gift toppers, magnets, and stocking fillers that look boutique-made without needing a jewellery bench or years of experience.
This is also a lovely beginner resin project because the pieces are small, affordable, and easy to batch-make. If you are already making handmade Christmas gifts, you might also enjoy our roundup of DIY Christmas earrings to wear for the holidays or, if resin is still new to you, CraftBits has a helpful basic resin casting tutorial that covers the fundamentals before you start mixing.
Why Christmas Resin Jewelry Is Such A Good Handmade Gift Idea
Christmas resin jewelry works beautifully because it can be made in so many styles. You can go vintage and nostalgic with old-fashioned Santa images, elegant with gold foil and pearl shimmer, playful with candy cane stripes, or modern with dried botanicals and tiny metallic stars.
It is also a clever craft fair idea. Small resin pendants, festive earrings, and Christmas brooches are easy impulse buys, especially when packaged nicely on a card or tied to a gift tag. They feel personal, but they do not take up a huge amount of table space, which is always a blessing when your craft stall is already groaning under the weight of “just a few extras.”
Supplies For DIY Christmas Resin Jewelry
You will need:
- Epoxy resin or UV resin suitable for jewelry making
- Small silicone molds, pendant trays, bezels, bottle caps, or wooden blanks
- Christmas paper, tiny printed images, gift wrap scraps, or scrapbook paper
- Mod Podge or clear-drying glue for sealing paper
- Glitter, mica powder, gold foil, sequins, tiny charms, or dried flowers
- Jewelry findings such as jump rings, earring hooks, bails, chains, brooch backs, or magnets
- Mixing cups and stir sticks
- Tweezers or toothpicks for placing tiny decorations
- Gloves and a protected work surface
A good resin jewelry kit, silicone pendant molds, UV lamp, jump ring pliers, and self-healing craft mat are all handy affiliate-style supply mentions here. If you are making earrings, lightweight bezels or small molds are best because no one wants Christmas trees dangling from their ears like actual tree ornaments.
Step 1: Choose Your Christmas Jewelry Style
Before you pour anything, decide what type of Christmas resin jewelry you want to make. This stops you from creating a tray full of “random festive circles,” which I say with love because we have all been there.
Good Christmas resin jewelry ideas include:
- Mini Christmas tree pendants
- Snowflake resin earrings
- Santa or vintage postcard necklaces
- Candy cane striped charms
- Gold foil star pendants
- Holly and berry brooches
- Resin gift tag charms
- Tiny nativity or angel pendants
- Christmas magnet sets
- Festive bottle cap necklaces
For a slightly recycled version, you could adapt ideas from this resin bottle cap necklace tutorial and use old bottle caps as tiny Christmas frames.
Step 2: Prepare Your Images Or Inclusions
If you are using printed Christmas images, scrapbook paper, old cards, or gift wrap, cut them to fit your bezel, tray, wooden disc, or bottle cap.
This is where the project starts to feel properly festive. Vintage Christmas cards are lovely for nostalgic pendants, while tiny patterned paper works well for earrings. You can also use old gift tags, postage-style designs, printed words like “joy” or “noel,” or tiny cut-outs from leftover wrapping paper.
If you plan to sell your Christmas resin jewelry at craft fairs or on Etsy, make sure you have permission to use the artwork commercially. Personal use is one thing, but selling is another, and nobody wants copyright drama tucked into their stocking.
Step 3: Seal Paper Before Adding Resin
Paper needs sealing before resin goes over it. Otherwise, the resin can soak into the paper and leave dark patches or blotchy spots. Very annoying, very avoidable.
Brush a thin coat of clear-drying glue or sealer over the front, back, and edges of the paper. Let it dry completely, then repeat. Two or three thin coats are better than one thick gloopy coat.
Pay extra attention to the edges. Resin has a sneaky way of finding any unsealed bit, especially right where you thought, “Oh, that will probably be fine.”
Step 4: Attach Your Design To The Base
Glue your sealed image into the bezel, wooden blank, bottle cap, or pendant tray. Smooth it down gently and make sure there are no air pockets underneath.
Let the glue dry fully before adding resin. This matters because trapped moisture or wet glue can cause cloudiness, bubbles, or lifting under the resin.
For wooden blanks, a thin layer of white paint or sealer underneath the paper can help colours look brighter. For bottle caps or metal bezels, make sure the surface is clean and dry before you start.
Step 5: Mix And Pour The Resin
Mix your resin according to the product instructions. Resin is not the place for “near enough” measuring. Too much of one part and you can end up with sticky pieces that never cure, which is heartbreaking when they looked so cute the night before.
Pour a small amount of resin into the pendant or mold. Use a toothpick to guide it into the corners and edges. For domed pendants, add resin slowly until it creates a glossy curved surface without spilling over.
If you are using UV resin, work in thin layers and cure between layers. This is especially useful for tiny Christmas earrings or pieces with glitter suspended at different depths.
Step 6: Add Glitter, Foil Or Tiny Charms
Now comes the fun part. Add tiny decorative pieces with tweezers or a toothpick.
Pretty Christmas resin jewelry inclusions include:
- Fine red, gold, silver, or iridescent glitter
- Tiny stars or snowflakes
- Crushed glass glitter
- Gold leaf or foil flakes
- Mini bells
- Tiny bows
- Sequins
- Dried red petals
- Faux snow
- Small metal charms
- Micro beads
Use a light hand. Resin magnifies everything, so a little glitter goes a long way. Too much and your elegant Christmas pendant can quickly look like a craft drawer sneezed into it.
If you love soft floral jewelry, this resin and flower jewelry idea is a lovely direction to explore for winter botanicals, dried petals, and more delicate handmade jewelry designs.
Step 7: Remove Bubbles
Small bubbles are common in resin, especially when mixing. Let the resin sit for a minute or two after pouring, then gently pop bubbles with a toothpick.
For epoxy resin, some makers use a quick pass of warm air, but be careful with small jewelry pieces because too much heat can push resin over the edges or disturb your inclusions.
The biggest bubble-prevention tips are simple: stir slowly, avoid whipping the resin, and pour gently.
Step 8: Let The Resin Cure Completely
Cover your pieces with a dust-free lid or container while they cure. A plastic storage tub turned upside down works perfectly.
Do not poke them. I know. It is almost impossible. But resin needs proper curing time, and fingerprints in half-cured resin are not the festive detail we are aiming for.
Follow the cure time on your resin instructions. Some pieces may feel firm before they are fully cured, so give them the full time if you want a durable finish.
Step 9: Add Jewelry Findings
Once cured, turn your resin pieces into finished Christmas jewelry.
You can add:
- Glue-on bails for pendants
- Jump rings and chains
- Earring hooks
- Brooch backs
- Magnet backs
- Keychain hardware
- Charm bracelet rings
If you are making Christmas earrings, keep them lightweight and balanced. Matching pairs do not need to be identical either. A snowflake on one side and a tiny star on the other can look charming, especially for handmade holiday jewelry.
For more easy jewelry inspiration, you might like these simple seed bead earrings or this polymer clay faux resin earrings tutorial if you want a resin-look project with a different material.
Easy Christmas Resin Jewelry Variations
Vintage Christmas Card Pendants
Use tiny sections of old Christmas cards, Victorian-style Santa images, angels, bells, or sheet music. Pair with antique bronze bezels for a nostalgic handmade gift look.
Glitter Snowflake Earrings
Pour clear resin into small snowflake molds and add fine white or silver glitter. These look lovely on simple earring hooks and make easy handmade stocking fillers.
Candy Cane Resin Charms
Use red and white mica powder or tiny striped paper pieces to create candy cane-inspired charms. These work well as earrings, zipper pulls, or gift tag decorations.
Gold Foil Star Necklaces
Clear resin with gold foil flakes always looks more expensive than it is. Add a tiny star charm inside the resin or use a star-shaped mold for a simple Christmas necklace.
Christmas Magnet Sets
Not everyone wears jewelry, so turn your small resin pieces into magnets. Sets of six festive magnets make sweet teacher gifts, neighbour gifts, or craft fair items.
Tips For Selling Christmas Resin Jewelry At Craft Fairs
If you are making Christmas resin jewelry to sell, presentation matters almost as much as the jewelry itself.
Attach earrings to simple kraft cards, display pendants on mini cards with a short description, and package magnet sets in clear bags with a festive topper. Use words shoppers understand quickly, such as “handmade Christmas earrings,” “resin snowflake necklace,” or “festive stocking filler.”
Offer a few price points. Tiny earrings, magnets, and charms can be lower-priced impulse buys, while larger pendants or sets can sit at a higher price. Christmas shoppers love small gifts that feel handmade but still look tidy enough to give without extra fuss.
You could also create matching sets: earrings and pendant, brooch and magnet, or charm and gift tag. Matching sets always make a craft table look more intentional.
Common Beginner Mistakes To Avoid
The most common mistakes with DIY resin jewelry are easy to fix once you know what to watch for.
Do not skip sealing paper. Do not guess resin measurements. Do not add too much glitter. Do not rush curing. And please, for the love of all things sparkly, do not pour resin on an uncovered table unless you are happy to have a permanent shiny patch beside your sewing machine.
Also check the weight of your pieces before turning them into earrings. A pendant can be chunky and charming, but earrings need to be comfortable enough to wear through a Christmas lunch without feeling like tiny baubles are pulling your ears down.
Handmade Christmas Jewelry That Feels Personal
The best thing about making Christmas resin jewelry is how personal it can be. You can tuck in a tiny piece of wrapping paper from a special gift, use a scrap of music from a favourite carol, preserve a child’s little drawing, or create matching pieces for friends who love the same festive colours.
It is a small project, but it has that lovely handmade feeling people remember. And if you end up making “just one more batch” at midnight because the glitter looked too good to put away, well, welcome to Christmas crafting. We have all been there.
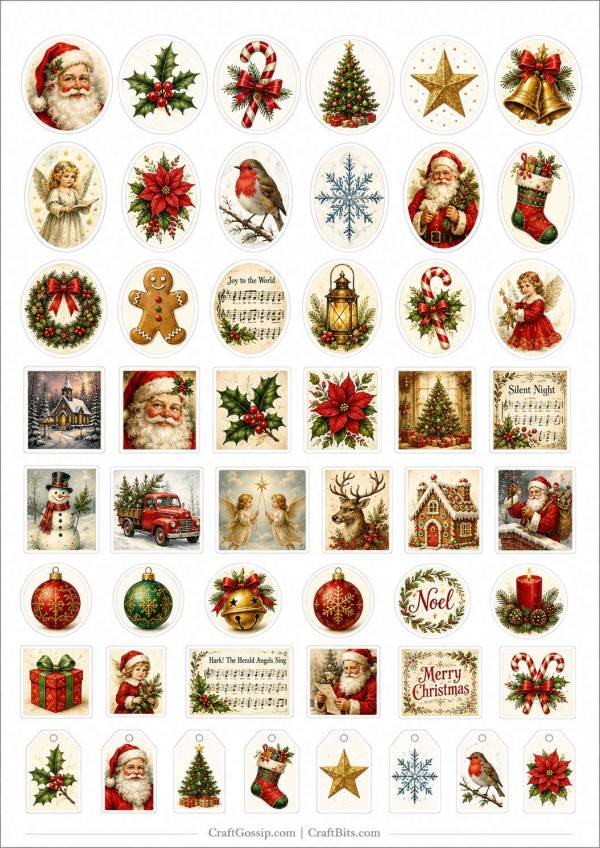
Right click and save the image below to print the free resin embed images.





Leave a Reply