• Home
  • Suggest A DIY
  • DIY Newsletter

Jewelry Making

DIY Jewelry, Beads And Patterns

  • About CraftGossip
  • Our Network
    • Bath & Body Crafts
    • Candle Making Ideas
    • Crochet Ideas
    • Cross Stitch
    • Edible Crafts
    • Felting Patterns
    • Glass Art
    • Home & Garden Ideas
    • Indie Crafts
    • Jewelry Making
    • Kids Crafts
    • Knitting Patterns
    • Lesson Plans
    • Needlework
    • Party Ideas
    • Polymer Clay
    • Quilting Ideas
    • Recycled Crafts
    • Scrapbooking
    • Sewing Patterns
    • Card Making
    • DIY Weddings
    • Not Craft Ideas
  • Giveaways
  • Roundups
  • Store
  • Search

HP TopShot Review: Part 1

April 9, 2012 by Stacie Hooder

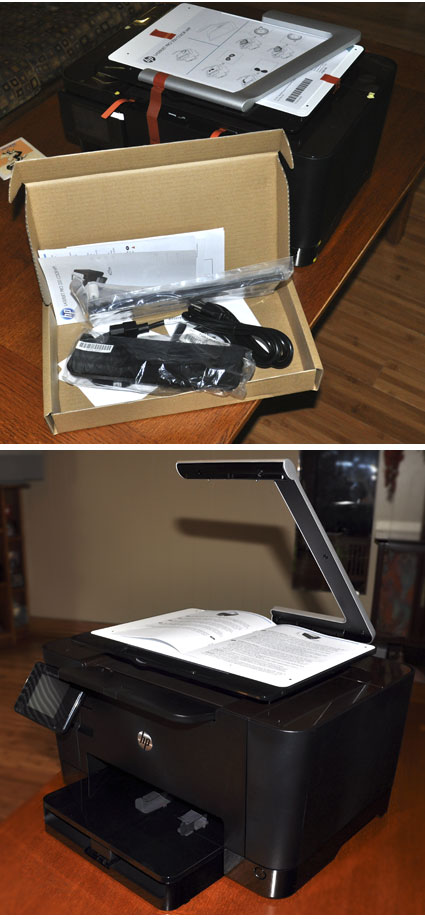
HP TopShot LaserJet Pro went from its carton to ready for use in about 15 minutes.Have you seen the new HP TopShot LaserJet Pro? HP is giving me a chance to review this new scanner, printer, and copier all-in-one — and then one lucky Craft Gossip reader is going to win one!

The box arrived at my door and within 15 minutes, I had the TopShot unpacked, together and ready to attach to my computer. The software installation files are in the TopShot’s memory so all you have to do is connect the cable and follow the on-screen instructions. That’s easy even if you don’t have much experience with computers, right? I attached the TopShot to my computer and in another 10 minutes, I have everything set up to print wirelessly!

I still haven’t told you the most exciting part about the TopShot. This is no ordinary scanner. The TopShot scans 3-D objects! The arm at the top has a high resolution camera in it that takes six images of your object, which are automatically combined into one high-resolution image. By combining multiple images, the TopShot quickly gives you a clear image on a bright, clean background. And your images can be immediately printed or posted directly to the Web!

Here’s my first scan of some tiny plastic forks. I was able to scan this image within 15 minutes of deciding to connect the this all-in-one printer to my computer! The actual scan took less than a minute.
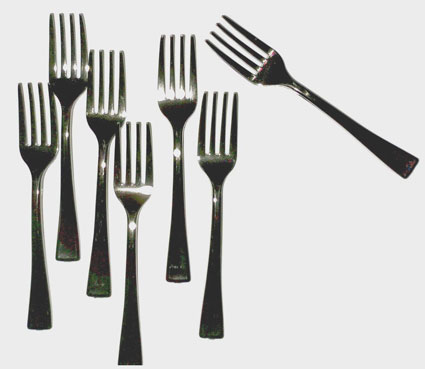
tiny plastic forks scanned with the HP TopShot's 3-D scanner.

«
»

Comments

  1. Mary Gross says

    April 10, 2012 at 1:29 pm

    What a cool tool to have. I would love it!

  2. ALICE HANCOCK says

    April 10, 2012 at 1:38 pm

    What a great idea – 3D scanning!

  3. Anne Pask says

    April 10, 2012 at 2:09 pm

    It is amazing. I have never seen a printer/scanner/copier which can come close to doing things like this one does! I can’t believe how quickly you were able to go from ‘in the box’ to a great scan.Wow.

  4. debbie myers says

    April 10, 2012 at 4:08 pm

    oh this looks like a fab scanner. i must have one. thanks

  5. barbara woods says

    April 10, 2012 at 4:33 pm

    would love that

  6. Sandy Gray says

    April 10, 2012 at 5:06 pm

    This is just cool! I WANT IT!!

  7. Jane T says

    April 10, 2012 at 5:20 pm

    What a super thing is this? I would love to be the winner of this. I love things like this!!!

  8. Sarah says

    April 10, 2012 at 5:35 pm

    WOW! Have not seen this. Would love to be a winner. Thank you for the opportunity. Sarah

  9. Peg Linge says

    April 10, 2012 at 6:23 pm

    Does this work to scan a cupcake? 🙂

  10. Cecilia Helena says

    April 10, 2012 at 6:56 pm

    Estou precisando de uma impressors HP nova.Obrigado pela chance de ganhar esta.

  11. Cecilia Helena says

    April 10, 2012 at 6:58 pm

    Estou precisando de uma impressora HP nova.Obrigado pela chance de ganhar.

  12. Vicky Sophon says

    April 10, 2012 at 7:07 pm

    Looks interesting. I’ll need to investigate this more.

  13. Kelly says

    April 10, 2012 at 7:11 pm

    this has to be one of the coolest things I have seen in a while!!!

  14. Kathie says

    April 10, 2012 at 8:55 pm

    Looks like a fun new “toy”!

  15. bessy says

    April 10, 2012 at 9:35 pm

    wow! what a nice tool. Me encanta espero ser la ganadora.

  16. AnkeE says

    April 10, 2012 at 9:47 pm

    oh what a great idea, thanks for the chance to win.
    Hugs AnkeE

  17. Dorothy S. says

    April 10, 2012 at 10:20 pm

    Would love to win this and surprise my husband. We both would love it.

  18. Mary Jo A says

    April 11, 2012 at 4:21 am

    With my present HP printer pretty much out-dated, would be great to win a new HP. I purchased an HP many years ago, and have nothing negative to say about it. Would love all the bells and whistles of this one!

  19. Karen says

    April 11, 2012 at 6:17 am

    This is awesome! Endless possibilities

  20. Darla Welch says

    April 11, 2012 at 6:53 am

    What will they come up with next! This is an amazing piece of equipment – the images are so realistic. I’d LOVE to win this.

  21. ohsue says

    April 11, 2012 at 8:06 am

    Just in time to replace my dying printer,

  22. Stacie Hooder says

    April 11, 2012 at 2:43 pm

    I’ll have to give that go!

  23. Ann says

    April 11, 2012 at 7:47 pm

    This would be a great addition to my new vintage store…

  24. Mia says

    April 11, 2012 at 10:20 pm

    This is so great. I can already think of a million uses!! Scanning my vintage compact collection would be my first project!

  25. Keri Lee Sereika says

    April 12, 2012 at 3:53 am

    Okay now that is the coolest thing I have seen all week! What a nifty idea! Thanks for the informative review!

  26. Christine Timko says

    April 12, 2012 at 11:47 am

    This is very impressive. I would like to use the printer/scanner at work to see how it works on old books.

  27. Allison says

    April 12, 2012 at 3:41 pm

    So exciting. I desperately need a new printer too. Oh, the amazing possibilities!

  28. Chrystine says

    April 13, 2012 at 6:48 pm

    that is so awesome! I would love to have a printer that not only didn’t swallow too many sheets of paper but could do all that marvelous stuff!

  29. vicky edwards says

    April 13, 2012 at 9:19 pm

    Hi, would love to win this. Thanks for the chance. vicky edwards

  30. Dawn McCreary says

    April 15, 2012 at 10:44 am

    That is too cool!!! Thanks for this chance.
    Good luck to all.
    D McC

  31. Ginny says

    April 15, 2012 at 3:22 pm

    Awesome! My mom would love this for mothers day. She makes all kinds of things that she has to print and she would love to be able to scan.

  32. Kymberly Pray says

    April 26, 2012 at 5:09 pm

    If, as often is the case in art, the aim of an image is to fool the eye, then this printer succeeds wonderfully. The possibilities are seemingly endless and my mind reels with all the fun that could be had.
    Thank you for the opportunity to win an infinitely useful tool.

  33. Laura Keane says

    April 27, 2012 at 4:24 am

    What a cool tool to have!! I’d love one!!

« Older Comments

Trackbacks

  1. CraftCrave | Blog | Textual List: Wednesday, 11 Apr 2012 says:
    April 10, 2012 at 11:01 pm

    […] HP TopShot Review: Part 1 – 1 freebie(s)? […]

  2. CraftCrave | Blog | Free Handcraft Items or Tutorials (large): Wednesday, 11 Apr 2012 says:
    April 10, 2012 at 11:01 pm

    […] HP TopShot Review: Part 1 – 1 freebie(s)? […]

  3. Jewelry - HP TopShot Review: Part 2 says:
    April 12, 2012 at 4:18 pm

    […] HP TopShot Review: Part 1 […]

  4. Jewelry - Review and Giveaway: HP TopShot LaserJet Pro says:
    April 15, 2012 at 3:04 pm

    […] the final installment of my review for the HP TopShot. If you missed part one or two of my review, be sure to take a look for more of what the TopShot can do. I’ve included […]

Have you read?

10 DIY Halloween Jewellery Ideas That Are Cute, Not Creepy

There is a very fine line between Halloween jewellery that feels fun and festive, and Halloween jewellery that looks like you raided the costume aisle five minutes before leaving the house. I say this with love, because we have all been there. A pair of plastic spider earrings, a glow-in-the-dark necklace from the bottom of the party box, and suddenly we are less “autumnal handmade goddess” and more “school disco chaperone who tried very hard.”

But cute Halloween jewellery? Now that is where the magic happens.

These DIY Halloween jewellery ideas are for those of us who want to enjoy the season without going full haunted house. Think sweet little ghosts, pumpkins, bats, sugar skulls, sparkly beads, handmade pendants and playful pieces you can actually wear to school pickup, work, craft group, lunch with friends, or while handing out lollies at the door.

I love Halloween crafting because it gives us permission to be a little silly with our supplies. You can pull out the orange beads, the black wire, the googly eyes, the air-dry clay, the glittery bits you bought three years ago and absolutely swore you would use. And jewellery is such a lovely way to join in without decorating the entire house or committing to a full costume.

These cute DIY Halloween jewellery tutorials are perfect for beginners, tweens, teens, craft groups, handmade gifts, market makes, and anyone who loves a seasonal accessory with a bit of personality. Nothing too creepy, nothing too gory, just sweet handmade Halloween jewellery with charm.

Cute Ghost Earrings For Halloween

These little ghost earrings are a lovely place to start if you want something recognisably Halloween without being over the top. They are light-hearted, playful and would be sweet for tweens, teens, or anyone who likes a bit of seasonal fun without the fright factor. They would also make cute non-candy Halloween gifts for friends or grandkids.

Project link: Halloween Ghost Earring Tutorial

Tiny Ghost Stud Earrings

If dangling earrings are not your thing, these ghost stud earrings are a softer and more everyday-friendly version of Halloween jewellery. They are affordable, lightweight and cute enough to wear all through October without feeling like you are dressed for a costume party. I love this style for anyone who wants a subtle handmade Halloween accessory.

Project link: DIY Ghosts Halloween Stud Earrings

Pumpkin Wire Earrings

Pumpkin jewellery is my favourite “cute, not creepy” Halloween option because it works for autumn, harvest season and Halloween all at once. These CraftBits pumpkin wire earrings use simple jewellery supplies, including wire, small green beads, jump rings and earring hooks, and the tutorial notes they take about 15 minutes to make. They are cheerful, wearable and a great stash-busting project.

Project link: Jewelry Making – Pumpkin Wire Earrings

Easy Bat Pendant

A bat pendant can go very spooky very quickly, but this one keeps things simple and crafty. It uses cardstock, glue, nail polish, jump rings and a chain, which makes it a clever low-cost Halloween jewellery idea if you do not want to buy special supplies. I would wear this over a plain black top and call that my Halloween outfit sorted.

Project link: Make An Easy Bat Pendant

Googly Eyed Necklace

This googly eyed necklace is wonderfully ridiculous in the best possible way. It is not elegant, and it is not trying to be, which is exactly why it works. This is the sort of Halloween jewellery project that gets comments, makes kids laugh, and gives you a chance to use those googly eyes hiding in the craft drawer.

Project link: Googly Eyed Necklace

Sugar Skull Necklaces From Air Dry Clay

Sugar skull designs bring colour and detail to Halloween jewellery without leaning into anything too scary. This air-dry clay necklace idea is a lovely one for crafters who enjoy painting, decorating and adding their own little flourishes. It would also be a nice family craft if you want everyone to decorate their own pendant in different colours.

Project link: Sugar Skull Necklaces From Air Dry Clay

Hand Drawn Halloween Pendant

If you enjoy doodling, painting or mixed media crafts, this hand drawn Halloween pendant is a sweet way to turn tiny artwork into jewellery. The original project uses vintage paper, wooden shapes and waterproof ink, so it has that handmade storybook feeling rather than a plastic costume-shop look. You could make pumpkins, moons, black cats, stars, candy corn or little haunted houses and keep the colours as soft or bold as you like.

Project link: Hand Drawn Halloween Pendant Tutorial

Sparkly Halloween Crystal Necklace

For a prettier take on Halloween jewellery, this sparkly crystal necklace is a good reminder that seasonal pieces do not have to be novelty-only. A bit of black, orange, purple or smoky crystal can feel festive and still look grown-up. This would be lovely for someone who wants Halloween jewellery that works with a nice blouse rather than a costume cape.

Project link: Sparkly Halloween Necklace

Crochet Ghost Pin

This little crochet ghost pin is adorable, especially if you prefer yarn crafts over beads and wire. The CraftBits pattern uses small amounts of white worsted weight yarn, wiggle eyes, a pin backing and glue, making it a sweet scrap-yarn Halloween project. Pin it to a cardigan, tote bag, scarf or denim jacket for a soft handmade touch.

Project link: Crochet Ghost Pin

A Few Tips For Making Halloween Jewellery Look Cute, Not Creepy

The easiest way to keep DIY Halloween jewellery wearable is to soften the colour palette a little. Instead of only using harsh orange and black, try adding cream, soft gold, lilac, blush pink, pearl, smoky grey, mint green or copper. It still feels seasonal, but it looks more handmade and less party-store.

Scale also makes a big difference. Tiny ghosts, small pumpkins and dainty bats feel charming, while oversized skulls and dripping designs can become costume-heavy very quickly. Of course, if dramatic is your thing, go for it. But for everyday Halloween jewellery, smaller motifs are usually easier to wear.

You can also turn almost any Halloween craft into jewellery by thinking smaller. A tiny crochet ghost becomes a brooch. A mini clay pumpkin becomes a pendant. A painted wooden charm becomes earrings. That is the joy of jewellery making — you only need a small amount of supplies to make something with personality.

And honestly, handmade Halloween jewellery is one of those projects that feels extra satisfying because you can finish it quickly and wear it straight away. No waiting for a big quilt to be bound, no half-finished basket of shame glaring at you from the corner. Just a cute little pair of earrings or a pendant, ready for October.

Tags

Bangles/Bracelets Beading Beginner Jewelry Making Book Reviews Craft Inspirations Crystal Jewelry Making DIY Necklace DIY Tutorials and Patterns earrings tutorials Felt/Fiber Halloween Jewelry For Men Jewelry Making - General Jewelry making - Supplies Jewelry Making Giveaways Jewelry Making Techniques Jewelry Making Tutorials and Ideas Mixed Media recycled/upcycled Wire Work

RSS feed: More Articles More Articles

  • FREE Dripping Font for Halloween
  • How to Create Easy Halloween Art Journal Pages
  • Etsy Feature – Pottery Travel Mug Template Set (3 Pieces)
  • Michaela McMillan: Weaving Stories into Sculptural Art
  • How to Add Text to a Cross Stitch Project
  • Beyond Basic Pumpkin Knitting Patterns
  • The Goldfish by Henri Matisse Advanced Cross Stitch Kit Review
  • Make To Donate: Crochet Chemo Cap Patterns
  • 32 Halloween Silhouette Digital Stamps and Die Cuts
  • 12 Free Baby Booties Sewing Patterns – Easy Fabric Shoes for Newborns & Babies

Pick Your Blog

  • Sewing
  • Knitting
  • Quilting
  • Crochet
  • Home & Garden
  • Recycled Crafts
  • Scrapbooking
  • Card Making
  • Polymer Clay
  • Cross-Stitch
  • Edible Crafts
  • Felting
  • Glass Art
  • Indie Crafts
  • Kids Crafts
  • Jewelry Making
  • Lesson Plans
  • Needlework
  • Bath & Body
  • Party Ideas
  • Candle Making
  • DIY Weddings
  • Not Craft
  • Free Craft Projects

Copyright © 2026 · CraftGossip | Start Here | Contact Us | Link to Us | Your Editors | Privacy and affiliate policy