• Home
  • Suggest A DIY
  • DIY Newsletter

Jewelry Making

DIY Jewelry, Beads And Patterns

  • About CraftGossip
  • Our Network
    • Bath & Body Crafts
    • Candle Making Ideas
    • Crochet Ideas
    • Cross Stitch
    • Edible Crafts
    • Felting Patterns
    • Glass Art
    • Home & Garden Ideas
    • Indie Crafts
    • Jewelry Making
    • Kids Crafts
    • Knitting Patterns
    • Lesson Plans
    • Needlework
    • Party Ideas
    • Polymer Clay
    • Quilting Ideas
    • Recycled Crafts
    • Scrapbooking
    • Sewing Patterns
    • Card Making
    • DIY Weddings
    • Not Craft Ideas
  • Giveaways
  • Roundups
  • Store
  • Search

HP TopShot Review: Part 1

April 9, 2012 by Stacie Hooder

HP TopShot LaserJet Pro went from its carton to ready for use in about 15 minutes.Have you seen the new HP TopShot LaserJet Pro? HP is giving me a chance to review this new scanner, printer, and copier all-in-one — and then one lucky Craft Gossip reader is going to win one!

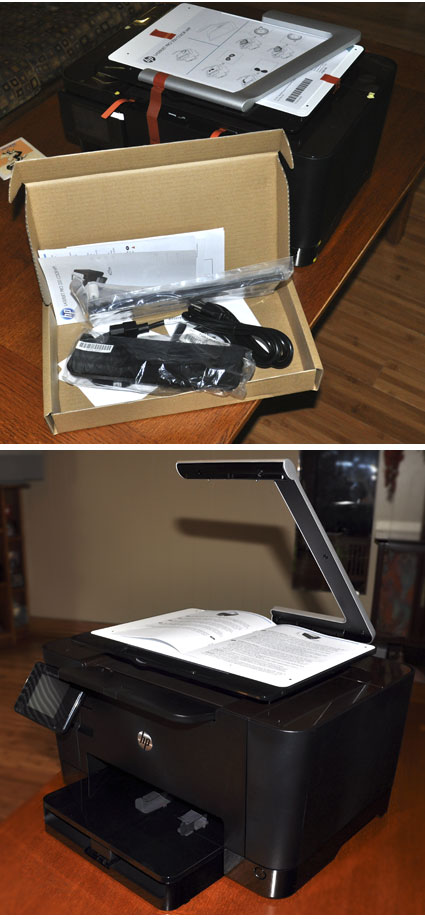
The box arrived at my door and within 15 minutes, I had the TopShot unpacked, together and ready to attach to my computer. The software installation files are in the TopShot’s memory so all you have to do is connect the cable and follow the on-screen instructions. That’s easy even if you don’t have much experience with computers, right? I attached the TopShot to my computer and in another 10 minutes, I have everything set up to print wirelessly!

I still haven’t told you the most exciting part about the TopShot. This is no ordinary scanner. The TopShot scans 3-D objects! The arm at the top has a high resolution camera in it that takes six images of your object, which are automatically combined into one high-resolution image. By combining multiple images, the TopShot quickly gives you a clear image on a bright, clean background. And your images can be immediately printed or posted directly to the Web!

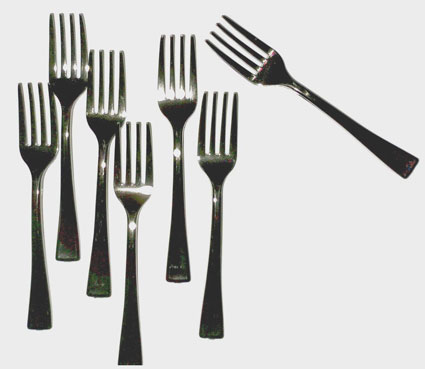
Here’s my first scan of some tiny plastic forks. I was able to scan this image within 15 minutes of deciding to connect the this all-in-one printer to my computer! The actual scan took less than a minute.

tiny plastic forks scanned with the HP TopShot's 3-D scanner.

Next Idea:

  • How To Start Jewelry Making: Beginner Tools,…
«
»

Comments

  1. Nicole Burris says

    April 9, 2012 at 8:47 pm

    That is so cool!

  2. Jocelan says

    April 10, 2012 at 2:05 am

    Looks really interesting.Thanks for the chance to win it.
    Jocelan

  3. Edythe N says

    April 10, 2012 at 2:25 am

    Haven’t seen or heard about this printer. I’ll watch for part 2 on your blog. Sounds interesting.

  4. Carol DeLater says

    April 10, 2012 at 3:27 am

    I want it!! I haven’t seen this model anywhere. Too cool.

  5. Elizabeth Campau says

    April 10, 2012 at 3:51 am

    Oh the potential of this just has my mind going 90 miles a minute!!!!!LOL

  6. Mary Lou says

    April 10, 2012 at 4:05 am

    I’m with u Carol! Too cool for words. I want one too!!

  7. Eileen says

    April 10, 2012 at 5:07 am

    I love HP products! Great way to support their users with new products!

  8. Audrey says

    April 10, 2012 at 5:09 am

    This is so cool. It would be great for the labels I make for my home-made body products. I NEED one!

  9. Sarah says

    April 10, 2012 at 5:14 am

    Me, Me, Me,

  10. Deb Neerman says

    April 10, 2012 at 5:48 am

    WoW, I love the 3-D scanning feature … those forks look perfect. I NEED this! Thanks for the info and the review!

  11. Patricia P. Hall says

    April 10, 2012 at 5:49 am

    Wow! Very exciting!

  12. Shelley S says

    April 10, 2012 at 5:53 am

    I repair printers and copy machines professionally and I have to jump in here and say that HP printers are the best. The best quality prints, the most users friendly, the easiest to repair and the absolute workhorse printer of the entire industry. They last forever. I would love to have one of these!!
    I do NOT work for HP and repair many different bands.

  13. smfsprout says

    April 10, 2012 at 6:14 am

    This is amazing and I have to agree with everyone else. I want one of these!

  14. Diana W says

    April 10, 2012 at 6:16 am

    Wow, this is great! The 3D is awesome. I can already think of many uses for this printer. Can’t wait for the contest!!:0)

  15. Sylvia Beeson says

    April 10, 2012 at 6:24 am

    I really, really want one of these. Going to retire soon and will depend more and more on my own computer and printer to stay in touch with my family and the world!!

  16. red carousel lion says

    April 10, 2012 at 6:25 am

    wow – what a great tool to use to make 3-d copies of multi-dimensional projects created.

  17. Euphemia Roecker says

    April 10, 2012 at 6:38 am

    Would love to use one of these to copy old family photos and to help design art work!

  18. Lori Moody says

    April 10, 2012 at 6:41 am

    What a fun new “toy.”

  19. spidermom says

    April 10, 2012 at 6:53 am

    ah! this machine looks so cool! i have been looking at upgrading my printer to one that has a scanner too, this one looks awesome!

  20. Shelly E says

    April 10, 2012 at 6:55 am

    what do i need to do to win?

  21. Anne says

    April 10, 2012 at 6:59 am

    OMG… this is such an awesome HP All-In-One! I love the 3D aspect of it — so cool. I would love to have one of these.

  22. Kim says

    April 10, 2012 at 7:20 am

    Wow, this would be really cool for scanning your items and then publishing a 3-D picture on your online storefront so people can get a better idea of what it looks like. Would love to win one of these! Thanks for the opportunity!

  23. Tina S says

    April 10, 2012 at 7:22 am

    I must have this printer!

  24. Julie Rule says

    April 10, 2012 at 7:30 am

    How fantastic is this piece of equipment? Can I have as much fun as you did, please?

  25. Dorothy says

    April 10, 2012 at 7:35 am

    This printer is just what I have been looking for. I like it, I like it.

  26. Melissa Kaye says

    April 10, 2012 at 7:40 am

    Love it! I think this would be great for all those kids’ art projects!

  27. Sandra says

    April 10, 2012 at 7:45 am

    Unbelievable, this is exactly what I need. what do I need to do to win it?

  28. Doris Meneses says

    April 10, 2012 at 8:07 am

    Any crafter needs this printer!!!!

  29. Desi says

    April 10, 2012 at 8:15 am

    Nice! I hope I win it!! Thanks for the chance to enter!!
    Desi

  30. Tifani says

    April 10, 2012 at 8:16 am

    oooh I so need this my printers (yes, printers) are both on their last legs!

  31. Colleen E says

    April 10, 2012 at 8:21 am

    That looks amazing, I have so many 3d objects I want to scan! Do you know how big the scannner bed/area is?

  32. Meari says

    April 10, 2012 at 8:29 am

    A very cool piece of equipment for sure!!

  33. THERESE says

    April 10, 2012 at 8:38 am

    moi aussi elle me plait bien cette imprimante

  34. Michele T says

    April 10, 2012 at 8:40 am

    Holy smokes this is an amazing and nifty device – I would love, love, love to win one!!!

  35. Nancy says

    April 10, 2012 at 8:43 am

    I was looking at this printer yesterday. I would so love to have it!

  36. Shannon Wynne says

    April 10, 2012 at 9:10 am

    Leave it to HP to come up with a tool from us crafters. This looks like one of those “must have” gadgets but it would be more wonderful to win this new printer with TopShot.

  37. Sierra Mohr says

    April 10, 2012 at 9:16 am

    My printer just died. I really need a new one. This one sounds perfect. And it is an HP, which is what I prefer!

  38. Mary Corley says

    April 10, 2012 at 9:31 am

    I need this printer

  39. KittenWithAWhiplash says

    April 10, 2012 at 9:33 am

    My first printer was an HPIII LaserJet that I had for over 20 years, and it was used when I got it. I’ve got anther used HP now, and I think it might last forever, so if I win this giveaway, my current printer will go back on CL for someone else to enjoy.

  40. Barbara says

    April 10, 2012 at 9:42 am

    Fantastic! I want, I need it!

  41. Cathy says

    April 10, 2012 at 9:44 am

    WOW! This would be awesome to have! I have lots of family info, pictures, and documents I want to pass on to family. I would love to try this machine to preserve them! Crossing my fingers! Pick me! Pick me! 🙂 LOL!

  42. Rosalie says

    April 10, 2012 at 9:50 am

    What a wonderful printer – I’d love to have one. Pick me. Pick me….

  43. Roseanna says

    April 10, 2012 at 10:04 am

    Oh, what an awesome printer…definitely want one of these!!

  44. CathyM says

    April 10, 2012 at 10:07 am

    Looks very versatile. I can think of a number of uses for it right off the bat.

  45. Judy H says

    April 10, 2012 at 11:26 am

    Awesome! Looks and sounds like a great machine. Go figure I really need a new printer! Please pick me!

  46. jenn says

    April 10, 2012 at 11:30 am

    I want this!! How do we enter to win??

  47. Marilyn says

    April 10, 2012 at 11:43 am

    WOW, that is slick! I’m thinking of all sorts of uses

  48. Nancy says

    April 10, 2012 at 11:46 am

    Oh the things I could do! (if I win!)

  49. Dorothy S. says

    April 10, 2012 at 12:35 pm

    I would love to win this for my husband and of course for me too.

  50. Michelle says

    April 10, 2012 at 12:54 pm

    I would love this printer. I can imagine all the cool things that I would scan.

Newer Comments »

Have you read?

Jewelry Making Tools For Beginners: What You Actually Need

Starting a new craft can be exciting, but it can also turn into a shopping rabbit hole very quickly. Jewelry making is no exception. One minute you are buying a packet of beads, and the next you are staring at twenty types of pliers wondering if you need all of them.

The truth is, you do not need a huge collection of tools to start making handmade jewelry. For beginner jewelry making projects like beaded necklaces, bracelets, earrings and charms, a small set of basic tools will take you a long way.

This guide covers the jewelry making tools beginners actually need, what each tool is used for, and which extras are nice to have later. It is designed for real crafters with real budgets and real drawers already full of mysterious supplies.

If you are just starting out, pair this guide with an easy project like this DIY birthstone necklace or these easy silk thread earrings.

1. Chain Nose Pliers

Chain nose pliers are one of the most useful tools in jewelry making. They have flat inner jaws and tapered tips, which makes them ideal for gripping, bending and holding small findings.

Use chain nose pliers for:

  • opening and closing jump rings
  • flattening crimp beads
  • holding small components
  • bending wire
  • adjusting clasps
  • tucking wire ends

If you only buy one pair of pliers to begin with, make it chain nose pliers. They are the workhorse of the jewelry making toolbox.

2. Round Nose Pliers

Round nose pliers have smooth, rounded jaws that taper to a point. They are used for making loops in wire.

Use round nose pliers for:

  • making simple loops
  • making wrapped loops
  • creating eye pins
  • shaping wire
  • making dangles for earrings
  • creating small charms

Round nose pliers are especially useful if you want to make earrings, pendant drops or wire-wrapped bead charms. Once you learn how to make a simple loop, a whole world of handmade jewelry opens up.

3. Flush Cutters Or Jewelry Cutters

Do not use your best sewing scissors for cutting jewelry wire. I say this with the voice of experience and regret.

Jewelry cutters are designed to cut wire cleanly. Flush cutters are especially useful because they leave one side of the cut wire flatter and neater.

Use jewelry cutters for:

  • cutting beading wire
  • trimming head pins
  • cutting eye pins
  • trimming soft jewelry wire
  • cutting chain

Keep your cutters for jewelry only. Cutting memory wire or thick hardware wire can damage delicate cutters, so check what your cutters are designed to handle.

4. Crimping Pliers

Crimping pliers are used to close crimp beads and crimp tubes neatly. You can flatten crimps with chain nose pliers, but crimping pliers create a more rounded, professional finish.

Use crimping pliers for:

  • finishing beaded necklaces
  • finishing beaded bracelets
  • securing clasps
  • shaping crimp tubes
  • making stronger jewelry ends

If you are only making one or two simple projects, chain nose pliers may be enough. But if you plan to make lots of necklaces or bracelets, crimping pliers are worth adding.

For more help with this technique, see our guide on using crimp beads without ruining your necklace once it is published.

5. Bead Board

A bead board is a tray with grooves that help you plan necklace and bracelet designs before stringing them. It usually has measurement marks, which makes it easier to create the right length.

Use a bead board for:

  • planning bead patterns
  • measuring necklace length
  • balancing designs
  • keeping beads from rolling away
  • arranging multiple strands

You do not absolutely need a bead board, but it is very helpful for beginners. If you do not have one, use a tea towel or felt mat on your table. The soft surface helps stop beads from escaping.

6. Bead Mat

A bead mat is a soft surface used for working with beads. It stops beads from rolling and gives you a clean workspace.

Use a bead mat for:

  • seed bead projects
  • sorting small beads
  • planning earrings
  • stringing bracelets
  • keeping beads visible

A simple felt square or soft cloth can work if you are not ready to buy a bead mat. The important thing is to avoid working directly on a hard, shiny table, unless chasing beads across the floor is part of your fitness plan.

7. Bead Stoppers

Bead stoppers are small spring clips that hold beads on wire while you are working. They are simple, cheap and surprisingly useful.

Use bead stoppers for:

  • keeping beads from sliding off wire
  • holding one end of a necklace
  • pausing a project safely
  • working on multi-strand jewelry

You can use masking tape or a small binder clip instead, but bead stoppers are neater and easier to remove.

8. Jump Ring Opener

A jump ring opener is a small ring worn on your finger with grooves for opening jump rings. It is not essential, but it can make repetitive work faster.

Use a jump ring opener for:

  • opening jump rings
  • attaching charms
  • making chain jewelry
  • connecting clasps
  • working on charm bracelets

If you make a lot of charm jewelry, this little tool is handy. If you are only starting out, two pairs of pliers will do the job.

9. Measuring Tape Or Ruler

Measuring matters in jewelry making. Necklaces, bracelets and anklets all need to fit properly.

Use measuring tools for:

  • necklace lengths
  • bracelet sizing
  • anklet sizing
  • chain lengths
  • bead spacing

A soft tape measure is especially useful because it can wrap around the wrist or neck. You can also use a ruler for straight wire and chain measurements.

10. Storage Containers

Beads multiply when you are not looking. One day you have a tidy little packet of beads, and suddenly you have seed beads, clasps, charms, wire, broken necklaces and something labelled “miscellaneous sparkle.”

Good storage makes jewelry making much easier.

Useful storage options include:

  • divided bead boxes
  • small jars
  • zip-top bags
  • labelled tubes
  • drawer organisers
  • tackle boxes
  • stackable craft containers

Sort by bead type, colour or project. There is no perfect system, only the one you will actually use.

Beginner Jewelry Making Supplies To Keep On Hand

Along with tools, it helps to have a few basic supplies ready.

A beginner jewelry making kit might include:

  • beading wire
  • jump rings
  • lobster clasps
  • crimp beads
  • head pins
  • eye pins
  • earring hooks
  • spacer beads
  • small charms
  • mixed beads

If you are buying supplies for the first time, look for a basic jewelry findings kit. These are often more affordable than buying every tiny packet separately.

Tools You Do Not Need Straight Away

Some jewelry tools are useful later, but beginners do not need them immediately.

You can wait before buying:

  • metal stamping tools
  • soldering equipment
  • resin tools
  • bead looms
  • torch tools
  • specialty wire jigs
  • expensive display stands
  • professional polishing machines

Start with simple projects first. Once you know what type of jewelry you enjoy making, it is easier to buy the right tools.

If metal stamping appeals to you, this ImpressArt bracelet making tutorial is a fun place to see how that style of jewelry can look.

Best First Projects For Your New Tools

Once you have your basic jewelry tools, try projects that build your skills gradually.

Good beginner projects include:

  • simple beaded bracelets
  • beaded necklaces with clasps
  • dangle earrings
  • charm bracelets
  • pendant necklaces
  • upcycled jewelry
  • wire bead charms

For a simple wearable project, try this wire necklace tutorial or this DIY wrap jewelry project.

What To Buy First If You Are On A Budget

If you are keeping costs down, start with:

  • chain nose pliers
  • round nose pliers
  • jewelry cutters
  • flexible beading wire
  • crimp beads
  • clasps
  • jump rings
  • beads

You can add a bead board, crimping pliers and storage boxes later.

A beginner jewelry making tool kit can be a good value if it includes decent pliers and cutters. Avoid very flimsy tools if possible, because they can make jewelry making more frustrating than it needs to be.

A Practical Beginner Tip

Do not buy every tool before making your first project. Make a simple necklace, bracelet or pair of earrings first, then see what you actually enjoy.

Some people fall in love with seed beads. Some adore wire wrapping. Some just want to make quick earrings from leftover beads. Your tool collection should grow around the kind of jewelry you actually want to make.

That is the nice thing about beginner jewelry making. You can start small, learn as you go, and still make something pretty enough to wear.


Tags

Bangles/Bracelets Beading Beginner Jewelry Making Book Reviews Craft Inspirations Crystal Jewelry Making DIY Necklace DIY Tutorials and Patterns earrings tutorials Felt/Fiber Halloween Jewelry For Men Jewelry Making - General Jewelry making - Supplies Jewelry Making Giveaways Jewelry Making Techniques Jewelry Making Tutorials and Ideas Mixed Media recycled/upcycled Wire Work

RSS More Articles

  • Everything You Need to Know About Embroidery Hoops
  • Needle Felting Fairy Tutorial by Santa Meada
  • Printable Stickers for Journals and Planners – Self Care
  • Stitch Your Favorite Fruit on a Sweater
  • 12 Color Wheel Inspired Scrapbook Layouts
  • Crafts With Old Bricks: Creative Ways To Upcycle Leftover Bricks
  • How To Make A Milk Mache Molding Compound
  • The 5 Outlet Placement Mistakes You Don’t Want to Make
  • Celebrate the Spirit of the Southwest with These Stunning Indian Navajo Tribal Quilt Patterns
  • Pricing Handmade Sewing Items Without Undervaluing Yourself

Pick Your Blog

  • Sewing
  • Knitting
  • Quilting
  • Crochet
  • Home & Garden
  • Recycled Crafts
  • Scrapbooking
  • Card Making
  • Polymer Clay
  • Cross-Stitch
  • Edible Crafts
  • Felting
  • Glass Art
  • Indie Crafts
  • Kids Crafts
  • Jewelry Making
  • Lesson Plans
  • Needlework
  • Bath & Body
  • Party Ideas
  • Candle Making
  • DIY Weddings
  • Not Craft
  • Free Craft Projects

Copyright © 2026 · CraftGossip | Start Here | Contact Us | Link to Us | Your Editors | Privacy and affiliate policy