• Home
  • Suggest A DIY
  • DIY Newsletter

Jewelry Making

DIY Jewelry, Beads And Patterns

  • About CraftGossip
  • Our Network
    • Bath & Body Crafts
    • Candle Making Ideas
    • Crochet Ideas
    • Cross Stitch
    • Edible Crafts
    • Felting Patterns
    • Glass Art
    • Home & Garden Ideas
    • Indie Crafts
    • Jewelry Making
    • Kids Crafts
    • Knitting Patterns
    • Lesson Plans
    • Needlework
    • Party Ideas
    • Polymer Clay
    • Quilting Ideas
    • Recycled Crafts
    • Scrapbooking
    • Sewing Patterns
    • Card Making
    • DIY Weddings
    • Not Craft Ideas
  • Giveaways
  • Roundups
  • Store
  • Search

Pieces Of Me Giveaway

November 22, 2009 by Shellie Wilson

Reindeer (pink)

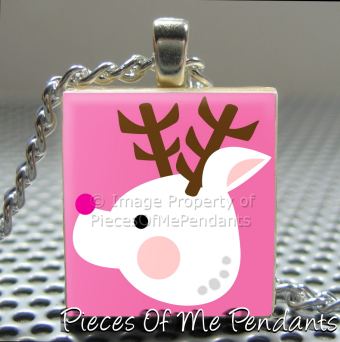
To launch her new products  (Scrabble Earrings, Charm Bracelets and Keychains) Lisa from

Pieces Of Me Pendants is  giving you the chance to win this adorable Reindeer pendant with ball chain for Christmas.

For your chance to win simply enter below.

Competition Open -Worldwide

Competition Closes – 1st December

For your chance to win simply enter here

Next Idea:

  • Easy Jewelry Making Projects That Sell Well at Craft Fairs
«
»

Comments

  1. tanya Barrett says

    November 22, 2009 at 6:23 pm

    it’s soo cute!

  2. Sheryl R says

    November 22, 2009 at 8:13 pm

    Please enter me.

  3. Tina S. says

    November 22, 2009 at 8:47 pm

    I just love Rudolph! I have a niece who would jump for joy to receive it….if she could pry it from my hand. Sure hope I win. ** Tina Has been selected as the Random Winner for this competition by admin**

  4. Ellen Lai says

    November 22, 2009 at 9:32 pm

    Cool! My girl would love this pendant, especially with the pink background.

  5. Bettina Groh says

    November 23, 2009 at 6:18 am

    My granddaughter would love Rudolph! With her favorite colors to boot and wouldn’t I love to sneak it into her stocking!? Lili’s Granny

  6. Stephanie Hill says

    November 23, 2009 at 8:10 am

    That pendant is absolutely adorable!!

  7. AlexandraV says

    November 23, 2009 at 8:30 am

    This one is amazing! So Christmasy, I can almost hear Santa’s sleigh… Please enter me to the competition.

  8. Stephanie says

    November 23, 2009 at 8:52 am

    Please enter me! The new shop is really great!

  9. Becky says

    November 23, 2009 at 8:56 am

    Simply adorable!!
    Thanks for the chance to win!

  10. Linda says

    November 23, 2009 at 9:08 am

    Love the reindeer and would wear it all the time!

  11. Mimi says

    November 23, 2009 at 9:36 am

    Very sweet Rudolph! Please put my name in for the giveaway!!

  12. Whitney says

    November 23, 2009 at 10:56 am

    What a darling pendant! I love it! Please enter me!

  13. Catie says

    November 23, 2009 at 11:02 am

    How cute is that!!!
    What a great giveaway – I love the darling rudolph
    Thanks for the opportunity
    Happy Holidays to you and yours
    Cheers
    Catie

  14. Sarah Ulfers says

    November 23, 2009 at 11:31 am

    this is so cute. I’d love to have one.

  15. Grace Wong says

    November 23, 2009 at 1:26 pm

    That is the cutest reindeer pendant ever!!!

  16. Cindy Lietz, Polymer Clay Tutor says

    November 23, 2009 at 6:27 pm

    What a darling little guy! My teen daughter would love him. That is if she could ever get it away from me! 🙂

  17. Mary Lynn says

    November 23, 2009 at 7:41 pm

    LOVE LOVE LOVE Rudolf!

  18. Jenn @ FFP says

    November 23, 2009 at 9:25 pm

    It’s so festive and perfect for Santa’s pending arrival!!! Love it!

  19. Mary says

    November 23, 2009 at 9:54 pm

    That is so adorable. My granddaughter would love it. Love that it’s pink rather than red or green.

  20. Jackie says

    November 24, 2009 at 9:12 am

    WOW this is soooo adorable! And December 1st is my Birthday this would be a wonderful present 🙂 Thanks for the chance to win!

  21. Kendra Goodrich says

    November 24, 2009 at 6:10 pm

    So adorable!

  22. Bev says

    November 27, 2009 at 10:11 am

    That is soo cute! I like the colors – not your typical red and green.

  23. Isabel says

    November 29, 2009 at 2:16 pm

    I want it 😉

  24. Mary Lynn says

    December 1, 2009 at 12:42 pm

    He is adorable..please enter me in oyour giveaway!

  25. Jennifer Parthenakis says

    December 1, 2009 at 7:19 pm

    so cute!

Have you read?

How To Make Matching Beaded Earrings From Leftover Beads

If you have just finished making a beaded necklace or bracelet, there is a very good chance you have a few leftover beads sitting on the table. Not enough for another big project, but far too pretty to put back in the bead box and forget about.

That is exactly when you make earrings.

Matching beaded earrings are one of the easiest beginner jewelry making projects, and they are perfect for using up small numbers of beads. You only need a few beads, two head pins or eye pins, two earring hooks and basic jewelry pliers.

This tutorial shows you how to make simple beaded dangle earrings using leftover beads. They are quick, beginner-friendly and a lovely way to turn scraps from a necklace or bracelet project into a complete handmade jewelry set.

If you enjoy easy earring projects, you may also like these easy silk thread earrings or this DIY handmade beaded dangle charm earrings tutorial.

Why Leftover Beads Are Perfect For Earrings

Earrings do not need many beads, which makes them ideal for using up tiny leftovers from other projects. Two pearls, a few seed beads, a pair of glass beads or a couple of gemstone chips can become a pretty matching set.

This is especially useful if you have made a necklace or bracelet and want earrings that coordinate without being too matchy-matchy. A little hint of the same colour is usually enough.

It is also a great project for those beads that are too special to waste but too few to do anything major with. We all have those beads. The “I’ll save these for something” beads. This is the something.

Supplies You Will Need

To make one pair of simple beaded earrings, you will need:

  • 2 matching feature beads
  • smaller beads or spacers, optional
  • 2 head pins or eye pins
  • 2 earring hooks
  • 2 small jump rings, optional
  • round nose pliers
  • chain nose pliers
  • jewelry cutters

If your ears are sensitive, use hypoallergenic, sterling silver, surgical steel or nickel-free earring hooks.

What Is A Head Pin?

A head pin is a straight piece of wire with a flat end or decorative end that stops beads from sliding off. It is used to make bead drops and dangles.

You thread beads onto the head pin, make a loop at the top, and attach it to an earring hook.

What Is An Eye Pin?

An eye pin is similar, but instead of a flat end it has a loop at one end. Eye pins are useful when you want to connect beads together or add a charm underneath.

For the simplest beginner earrings, start with head pins.

Choosing Beads For Matching Earrings

Choose beads that are light enough to wear comfortably. Earrings should not pull on the ear.

Good bead choices include:

  • small glass beads
  • pearls
  • seed beads
  • gemstone chips
  • crystal beads
  • wooden beads
  • metal spacers
  • acrylic beads

For matching earrings, choose two similar beads for the main feature. They do not have to be perfectly identical, especially with handmade or natural beads, but they should feel balanced.

If you are using beads from a necklace project, use one or two of the same beads from the necklace and add a small spacer for a coordinated look.

Step 1: Plan Your Earring Design

Lay out the beads for each earring side by side.

For a simple design, try:

  • one pearl and one spacer
  • one gemstone bead with seed beads above and below
  • three small beads stacked together
  • one glass bead with a metal spacer
  • one charm with a bead above it

Keep both earrings similar in length and weight. If one earring is much heavier than the other, it will feel odd when worn.

Step 2: Add Beads To The Head Pin

Thread your beads onto the head pin.

The bottom bead should be large enough that it does not slip over the flat end of the head pin. If the bead hole is too large, add a small seed bead or spacer first.

Leave enough wire at the top to make a loop. Around 1 cm is usually enough for a simple loop, but beginners may prefer to leave a little more and trim later.

Step 3: Bend The Wire

Using chain nose pliers, bend the wire at a right angle just above the top bead.

This creates the start of the loop and helps the bead dangle hang neatly.

Step 4: Make A Simple Loop

Hold the end of the wire with round nose pliers and roll it back towards the beads to form a loop.

The loop should be closed enough that it will not slip off the earring hook. If there is extra wire, trim it carefully with jewelry cutters.

This step may take a little practice. Your first loop may look a bit wonky. That is perfectly normal. Mine certainly did, and I still wore them.

Step 5: Attach The Bead Dangle To The Earring Hook

Open the loop at the bottom of the earring hook or use a small jump ring.

Always open jump rings by twisting sideways, not pulling apart. This helps them close neatly again.

Slide the bead dangle onto the hook or jump ring, then close it securely with pliers.

Repeat for the second earring.

Step 6: Check The Pair

Hold both earrings up together and check that they are the same length.

Make sure:

  • the loops are closed
  • the beads are secure
  • the hooks face the same direction
  • the earrings hang evenly
  • no wire ends are sharp

If one loop is slightly larger than the other, adjust it gently with pliers.

Easy Beaded Earring Variations

Pearl Drop Earrings

Use one pearl on each head pin with a tiny gold or silver spacer above it. Simple, classic and perfect for gifts.

Seed Bead Stack Earrings

Stack several seed beads in coordinating colours. These are lightweight and great for using up tiny leftovers.

Gemstone Chip Earrings

Use small gemstone chips for a natural boho look. Add a metal spacer at the top or bottom to make the design feel finished.

Charm And Bead Earrings

Add a charm underneath a small bead using an eye pin or jump ring. This works beautifully for seasonal earrings, initials or themed gifts.

For a fun seasonal idea, see these DIY Halloween blood drip earrings.

Mismatched But Coordinated Earrings

Use different beads in the same colour family. This gives a handmade, artsy look without needing perfect pairs.

Tips For Making Earrings Look More Professional

Use matching metal finishes. Gold hooks, gold pins and gold spacers look neater together.

Keep the earrings lightweight. Heavy earrings may look dramatic, but they are not always comfortable.

Make sure loops are fully closed. This keeps the bead dangle from slipping off.

Trim wire neatly. Sharp wire ends can catch in hair, scarves or jumpers.

Use good quality earring hooks if gifting. A pretty handmade earring deserves a finding that feels comfortable and safe.

Beginner Mistakes To Avoid

Do not make the earrings too heavy. If the bead feels heavy in your hand, it will probably feel heavy on your ear.

Do not leave loops open. Even a tiny gap can let the dangle slip off.

Do not cut the wire too short before making the loop. It is much easier to trim extra wire than to make a loop with barely anything to hold.

Do not worry if the first pair is not perfect. Simple loop making is a skill, and it improves quickly.

Turning Earrings Into A Matching Set

If you have made a necklace or bracelet, use the same beads in the earrings for a coordinated handmade set.

Try these combinations:

  • pearl necklace with pearl drop earrings
  • gemstone bracelet with tiny gemstone earrings
  • seed bead necklace with stacked seed bead earrings
  • charm bracelet with matching charm earrings
  • birthstone necklace with birthstone earrings

For another handmade gift idea, try this DIY birthstone necklace. Birthstone jewellery always feels thoughtful, even when it is simple to make.

Why This Is Such A Useful Beginner Project

Beaded earrings are quick, inexpensive and perfect for practising basic jewelry making skills. You will learn how to use head pins, make simple loops, open jump rings and attach earring hooks.

You can make a pair in under an hour, and once you get the hang of it, you may find yourself making earrings from every leftover bead on the table.

Which is not a bad problem to have, really. There are worse things than a little box full of handmade earrings.

Tags

Bangles/Bracelets Beading Beginner Jewelry Making Book Reviews Craft Inspirations Crystal Jewelry Making DIY Necklace DIY Tutorials and Patterns earrings tutorials Felt/Fiber Halloween Jewelry For Men Jewelry Making - General Jewelry making - Supplies Jewelry Making Giveaways Jewelry Making Techniques Jewelry Making Tutorials and Ideas Mixed Media recycled/upcycled Wire Work

RSS More Articles

  • Knit a Pet Bed on a Knitting Machine
  • How To Sew A Throw Pillow: Easy Pillow Cover Tutorials For Beginners
  • Printable Stickers for Journals and Planners – Household Chores
  • Activities for Teaching the Alphabet
  • 10 Crafty Friends Scrapbook Layout Ideas
  • Book Review Wednesday: Air-Dry Clay Making Handbook
  • The Air Fryer Queen by Steph de Sousa Review: A Colourful Cookbook That Feels as Fun as It Looks
  • Bulky Velour Poncho – Free Crochet Pattern
  • Free Summer BBQ Digital Stamps for Card Making and Paper Crafts
  • Why You Need A Stick Blender For Soap Making

Pick Your Blog

  • Sewing
  • Knitting
  • Quilting
  • Crochet
  • Home & Garden
  • Recycled Crafts
  • Scrapbooking
  • Card Making
  • Polymer Clay
  • Cross-Stitch
  • Edible Crafts
  • Felting
  • Glass Art
  • Indie Crafts
  • Kids Crafts
  • Jewelry Making
  • Lesson Plans
  • Needlework
  • Bath & Body
  • Party Ideas
  • Candle Making
  • DIY Weddings
  • Not Craft
  • Free Craft Projects

Copyright © 2026 · CraftGossip | Start Here | Contact Us | Link to Us | Your Editors | Privacy and affiliate policy